
This post includes affiliate links. As an Amazon Affiliate I earn from qualifying purchases. Find out more about affiliate links.
A sous vide turkey breast might sound like a fancy or difficult way to cook Thanksgiving dinner for a smaller crowd, but I promise it’s neither.
If you can rub salt onto meat and slide it into a bag, you can absolutely make this tender herb and garlic turkey with either a sous vide cooker or a steam oven. In fact, I’m willing to bet this will be the easiest Thanksgiving or Christmas dinner you’ve ever done, and it won’t look in the least like you’ve cheated (even though you’ll feel like you have).
Turkey breast is perfect for smaller parties

I know it’s traditional to roast a whole turkey for special holiday meals in many parts of the world. But for many people it’s not that practical.
If you’re catering for less than ten or twelve people there’s the matter of having way too much meat with a whole bird, and if you live in a hot climate, having the oven on all day to cook it is not appealing to anyone.
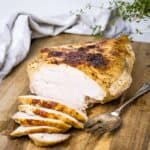
Let me make the argument instead for this turkey breast. Firstly, a turkey’s white meat, cooked sous vide with a few basic seasonings, is amazing. Tender, juicy and packed with more flavor than you ever thought possible from the ‘bland white meat’.
A mid sized turkey breast is also the perfect quantity to generously serve around 6 people, and will leave you with oven space, time and a relaxed enough mind to make sides, trimmings and the all important dessert course!
Other celebratory steam oven dishes:
Steamed and Roasted Whole Turkey
Christmas Roast Duck
Bacon Wrapped Sausages
Sausage and Herb Stuffing
Steamed Pumpkin Cheesecake
What you need to know to sous vide a turkey breast
Honestly, if you have a steam oven which will cook at low temperatures (below 212°F/100°C), or a sous vide immersion circulator, this turkey breast is ridiculously simple to make.
I’ve talked about sous vide before, and the fact that if you use a steam oven to do it, you may not need to seal the meat inside a bag for cooking. For this dish, though, I think you do need to bag no matter which appliance you use.

The fantastic flavor and juiciness in the turkey comes from it being sealed and chilled with salt, herbs and garlic. The salt is effectively dry brining the meat, while the herbs and garlic perfume it without the effort of rubbing seasoning under the skin (the common way an oven roasted turkey is infused with flavor).
If you make this dish by steaming the meat without bagging, the salty juices sort of wash away during cooking, and the concentration of the herbs and garlic all but disappears. In the bag, all that seasoning is concentrated and has nowhere to escape to. I’ve tried both ways and the bag method is far superior.
Don’t skip the resting/chilling time for the meat once you’ve bagged it, either. A night in the fridge (anything up to a full 24 hours, in fact) helps the flavors penetrate the meat much better than if you cook it straightaway, and it slightly cures the flesh to give a better texture. Leftovers from the cured breast I made were also easier to slice, firmer but just as juicy as the one I cooked straightaway. Your next-day turkey sandwiches will thank you just as much as your dinner guests for that resting time before cooking.

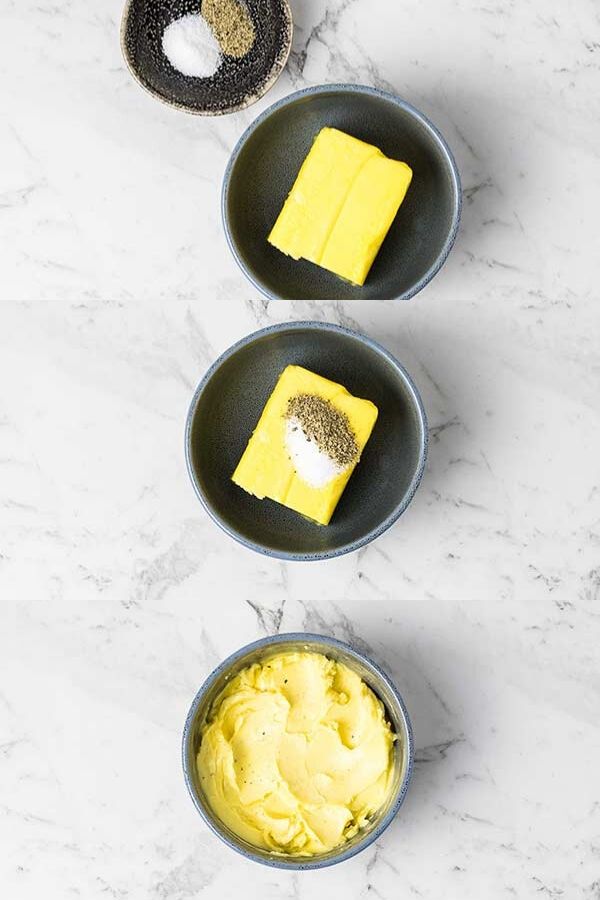
One other thing you might wonder about is why I only add the butter at the end of cooking here, for the broiling/grilling step. I also tested this vs putting it into the bag with the uncooked meat, and found the butter didn’t add anything while the meat was cooking. Butter is invaluable for adding richness and to help crisp the skin at the end, but in the bag it just melted around the meat. It’s easier to prep without butter and add it later, so that’s what I’ve done.
Looking for more steam oven sous vide posts?
How to Sous Vide Steak in a Steam Oven
Sous Vide Pork Belly with Watermelon Salad
Mexican Poached Chicken Salad
Do you want to use and love your steam oven more?
Steam Oven Insiders is a membership for steam oven cooks who’d like to know, use and love their combi steam ovens more.
In addition to an ad-free experience across the entire Steam & Bake website, Insiders also get exclusive access to a growing library of premium content, from recipes (always!) to downloadable cooking charts and guides, seasonal steam oven cooking ideas and more, delivered straight to your inbox in a helpful and inspiring twice-monthly newsletter.
As an Insider, you get the opportunity to shape the content published here, by requesting recipes and asking your curly steam oven cooking questions.
Not ready to become an Insider just yet? I hope you’ll still enjoy the hundreds of free recipes and articles across the Steam & Bake site, and that you’ll consider joining us in future.
Can you sous vide bone-in breast or whole turkey instead of boneless breast?
You sure can!
For a bone-in breast, with the small wing bone still attached, follow the same directions below. If it weighs more than 5.5lb/2.5kg, increase the sous vide/steam cooking time to 4 hours to ensure the meat reaches and holds the correct temperature for long enough to pasteurize it.
If you want to try this method with an entire bird, it can be done but you’ll need to think about a couple of things. Firstly, it’ll be easier to manage if you spatchcock the bird. It’ll take less time to cook than a whole bird, and the skin will be more evenly exposed for the final step. A whole spatchcocked turkey takes up a reasonable amount of space, though! Make sure your oven (or the container your immersion circulator is in) has the capacity to fit the bird, and that you have a large enough bag to fit it into (I haven’t used, but have seen these expandable vacuum bag rolls which look great if you have a sealer).
For a whole spatchcocked bird with bones in, around 10lb/4.5kg, you’ll want to prepare it the same way as the directions below, but cook it for 6 hours instead of 3.
If turkey isn’t your thing at all, feel free to try this method with a whole spatchcocked chicken instead. It’ll need to cook for around 4 hours.
I hope this recipe helps those of you looking for a simpler way to prepare your holiday centerpiece dish. I don’t think you’ll regret it come party day, and nor will your stress levels!
Happy cooking, see you here again soon.
Recipe: Sous Vide Turkey Breast with Herbs and Garlic
Sous Vide Turkey Breast with Herbs and Garlic
Ingredients
For cooking the meat:
- 4.5 lb turkey breast 2kg single breast, boneless, skin on (see note for bone-in breast option)
- ¾ tsp salt fine or table salt
- 2 stalks rosemary fresh
- 2 stalks thyme fresh
- 5 leaves sage fresh
- 3 cloves garlic bruised, skin on is fine
To finish:
- 4 oz unsalted butter softened
- ½ tsp salt fine or table salt
- ½ tsp black pepper cracked
Instructions
Prepare the meat and chill overnight:
- Rub the salt all over the underside and under the skin of the turkey (you can loosen the skin by carefully sliding your fingers underneath, then sprinkle salt in there and rub it all over before smoothing the skin back over the meat nicely).4.5 lb turkey breast, ¾ tsp salt
- Put the salted meat into a vacuum bag with the herbs and garlic tucked underneath and seal.2 stalks rosemary, 2 stalks thyme, 5 leaves sage, 3 cloves garlic
- Return the turkey to the fridge for the flavors to infuse, for anywhere from 12 to 24 hours.
Cook the turkey:
- When you’re ready to cook the turkey, preheat oven to 150°F/65°C, steam only (100% humidity).
- Put the bagged meat onto a perforated pan or directly onto the oven rack and cook for 3 hours.
- While the turkey is cooking, mix the butter, salt and pepper in a small bowl and set aside.4 oz unsalted butter, ½ tsp salt, ½ tsp black pepper
- At the end of cooking, remove the turkey from the oven and cut open the bag. Discard the herbs and garlic but keep any cooking juices.
Crisp the skin and serve:
- Preheat a broiler/grill to high heat. While it heats, put the turkey, skin side up, into a solid pan with the cooking juices poured around it.
- Smear the butter over the skin (all of it, I know it looks like too much but trust me) and broil/grill until it’s golden brown. The butter will melt off into the pan fairly quickly, likely before you even get it under the broiler; once it does, baste the turkey with the melted butter and pan juices frequently until it reaches the color you’re looking for. If you find there are spots getting too browned, just cover those bits with a little foil while the rest of the skin catches up.
- Rest the turkey in a warm place for 20-30 minutes, then carve into thin slices for serving, with some of those buttery pan juices drizzled over the top.
- Leftovers, if you’re lucky enough to have any, will be tender and succulent enough to eat cold the next day.
Notes
- When it comes to serving sizes, I allow 10.5oz/300g uncooked meat per person for boneless meat (bump this up to 1lb/450g if you’re doing one of the bone-in options).
- Double layered zip lock bags will do for this recipe if you don’t have a vacuum bag/sealer, but I do recommend you bag the meat and seasonings somehow. This allows the seasonings to penetrate the meat better, vs just putting them next to the meat and cooking it uncovered, where the flavors will be almost undetectable in the finished dish. To do the zip lock bag option, put the filled bags into a large container of cold water. Have the inner bag’s sealing strip sitting just under the outer one, then let the water come up almost to the sealing strips of the outer bag to displace the air. Close the inner seal first, then the outer one and remove from the water.
- Do not buy a brined turkey breast for this dish (most frozen supermarket turkey is brined, so check carefully). The salting and seasoning of the meat takes care of this for you; if you do it to an already brined piece of meat it’ll come out far too salty.
Nutrition
Over to you – if you try this recipe I’d love to know about it! Share your comments below or on Facebook, tag @steamandbake on Instagram, or pin all your favourite Steam and Bake recipes over on Pinterest!
Would you like more recipes and tips to help you cook with confidence? Join the mailing list to be alerted to new posts.


")


4 Responses
My first attempt at sous vide turkey in the CSO. It was everything you promised and more. The juiciest tastiest turkey I’ve ever eaten. It looked and tasted amazing. Thanks Emily!!
Thank you Emily. I am most grateful for your help.
Don’t double the cooking time; just pop the turkey breasts in the bag/s and make sure they’re spaced in the oven so the heat can circulate around each one. Cooking time remains the same. But yes, you can definitely do the sous vide/steam part the day before! When it’s done, chill the bagged turkey in an ice bath to get the temp down quickly, then store it in the fridge. Reheat to the same temperature you cooked at (it’ll take a while, I’d go for about an hour), then continue on with the browning and serving steps.
This is exactly the recipe I was looking for!
I have steamed chicken breasts in my new steam oven that were the most juicy and tasty I’ve ever done (65 deg for 1 hour) and was hoping to do something similar for the Christmas turkey.
I will need to do 2 turkey breasts though – around 2 kg each and each in their own bag. Does this mean I would steam for 6 hours?
Also, can I steam the turkey the day before and brown on Christmas morning? If so, what is the best (and safest) way to reheat the turkey before browning?
Thank you for your recipe and for your help.