
If you’ve ever looked up how to sous vide chicken breast, you’ll know that most sous vide chicken directions have you seal the meat in a vacuum bag before dropping it into a temperature-controlled water bath. The meat cooks slowly and evenly, resulting in a fantastic juicy texture from edge to edge, with minimal hands-on effort.
What if you could sous vide chicken without a bag, though?!
You can. It’s called sous vide in a steam oven. And if you’re here, you probably own a steam oven already, so that’s handy (if not, maybe you want one? Take a look at my ‘should I buy a steam oven‘ post to help you decide!).
Cooking chicken sous vide is a great way to prepare what can sometimes be a dry cut of meat. The big drawback has been that when you cook by this method, you need to put your meat into either a vacuum bag, a Ziploc or a reusable silicone food stasher. These aren’t difficult items to get hold of, but single use plastics are fraught with environmental and food safety concerns.
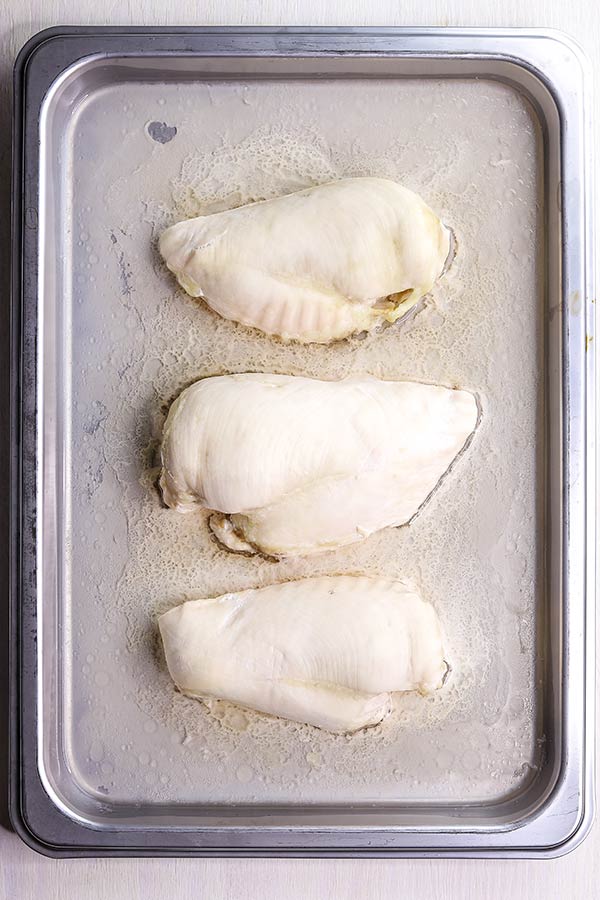
Today I want to show you how I sous vide chicken breast at home, using my steam oven and a pan. That’s right, no bag at all.

Why sous vide chicken?
Let’s just talk a little about why you would sous vide chicken. I mean, it’s a pretty boring cut of meat, really. Little fat, and often it’s pretty bland, especially if you’re working with mass produced chicken. Before sous vide chicken, I was ‘off’ chicken breasts in general because they needed such careful seasoning and treatment to make them good.
The beauty in sous vide-ing your chicken (yes, I did just ruin grammar. I’m not that sorry.) is that instead of a dry stringy chicken breast, you get a texture that’s really juicy and doesn’t lose the moisture that’s inside the breast. So you have chicken that everyone actually wants to eat!
Another great thing about sous vide chicken? It’s amazing for batch cooking because it stores and reheats really well. When I make chicken this way, I cook at least twice as much as I need for a meal. I can then freeze and use the extra to make a fast dinner in the future.
Oh, and I almost forgot: it’s dead easy. Like, really easy. Whack it on a tray and put it in the oven, and come back a couple of hours later.
Food safety when cooking sous vide
If you’re unfamiliar with sous vide cooking, you might think the temperatures below are way too low to safely cook your chicken.
They’re not. Proper, safe cooking relies on both time AND temperature to kill any pathogens in your meat.
Holding the chicken at a steady 149°F/65°C until the center has been at that temperature for at least 4-5 minutes will pasteurize it, and is just as safe as cooking it at a higher heat until it hits 165°F/74°C, then immediately taking it out of the pan or oven.
The big difference? The outside of the high-heat chicken will hit temperatures way above that 165°F/74°C in order for the center to get to the correct temperature quickly. It will be stringy, graduating to softer in the middle. The 149°F/65°C sous vide version will be cooked to exactly the same doneness (that is, juicy, tender and fabulous) edge to edge.
If you want to read up more on how different temperatures affect the cooking of your chicken, check out this article by the brilliant J. Kenji Lopez-Alt, where he discusses it in depth.
Do you need a bag to cook sous vide chicken?
The title of this post is how to sous vide chicken breast without a bag, so let’s talk about that.
In short, nope, no bag necessary!
Technically, sous vide cooking is done under vacuum in a water bath. The advent of domestic steam ovens with precise and steady temperature control means we can apply the principles of sous vide in a more simple-to-use environment. So, instead of sealing my chicken in a bag I can simply put it onto a tray and into an oven where the humidity level is 100%. As long as the temperature is right, this mimics the environment inside a bag.
There are some sous vide dishes which benefit from being bagged, even in a steam oven. Certain vegetables retain their sugars better if vacuum sealed before sous vide cooking (asparagus and green beans come to mind). And foods which are marinated sometimes require a bag to make sure the marinade permeates into the food.
As far as our simple chicken breast goes, though, the no-bag method is perfect.

Two different ways to sous vide chicken
There are actually two different methods you can try when it comes to sous vide chicken breast. Both are equally successful, but one is almost totally hands-off while the other needs a little intervention (you’ll save on time, though).
- This is the more traditional steady-state temperature method, where we pop the chicken into the steam oven at around 149°F/65°C and let it sit there for 1-4 hours. This is the easiest way to go and ensures your chicken is fully cooked and pasteurized without hands-on effort from you.
- If you can’t wait an hour or more, you can actually speed things up. This trick is something I learnt from Scott Heimendinger, sous vide expert, tech genius and all around fantastic cook and gentleman.
Scott’s method is to set the oven temperature a little higher, around 164°F/73°C, and use a meat probe to cook the chicken until it reaches 142°F/61°C in the center. This takes around 20-30 minutes. You then alter the temperature of your oven to 145°F/65°C and hold it for another 20 minutes to make sure it’s pasteurized.
This method gives you a similar result in less time, so it’s become a common way for me to cook chicken. I use the slower method if I have time and don’t want to muck around with oven settings.
How much sous vide chicken can you cook at once?
You can scale quantities up or down as necessary with this method. Temperature and time remain the same no matter how much you’re cooking.
I’ve done as few as one chicken breast and as many as 18 in a single batch; just make sure you lay them out in a single layer with a little space between each breast. If you’re doing a large quantity, divide them over two or three pans so they get even heat circulation.
Do you need to season chicken before cooking sous vide?
If you’d like to season your chicken prior to cooking, you can.
If I have time, I salt both sides of the meat and set aside for 2 hours in the fridge. This is what I’d call a quick dry-brine, and it makes a huge difference to the flavour of the cooked chicken.
You can rub dry spices and herbs onto your chicken before cooking if you’d like a particular flavor profile. Think Cajun spices, Italian herb mix, Moroccan seasoning, or a barbecue style rub. Just remember whatever you add won’t brown or reduce, because you’re cooking at low temperature with a lot of humidity.
If you want ultimate flexibility to use your cooked chicken in a variety of ways, cook it unseasoned. When I do this, it’s because I plan to add seasoning later, and let the seasoning sit on the chicken for some time before I eat it, allowing the flavors to mix with the meat.
What to do with sous vide chicken breast

- Sometimes I will simply cook my chicken, slice it and pop into the fridge, where it’s a good meal-prep source of protein. The flavors can be switched up to suit what you’re having for lunch or dinner.
- Use it in a salad. Try swapping out the turkey for chicken in my Vietnamese noodle salad. Or add it to red rice, quinoa and pumpkin salad, or my Christmas rice salad, for extra heft.
- Mix it with steamed couscous, roasted or raw vegetables and feta cheese, then dress with vinaigrette for a fast lunch or light dinner.
- Shred sous vide chicken and mix with a tomato-based sauce spiked with taco mix. We use it to create tacos, nachos or pulled chicken rolls. It’s popular with my kids and great to serve a crowd if you end up with surprise dinner guests.
- If the kids aren’t eating with us, I love a quick garlic, white wine and mustard sauce with chicken. Pan fry sous vide chicken in butter to brown, then remove chicken to a plate and turn the heat down. Saute crushed garlic, add a cup of white wine and simmer to reduce, then stir in a tablespoon of grain mustard and a splash of cream. Return the chicken to the pan to warm through and serve your 5-minute, restaurant quality dinner with smug pride. 😉
- For summer grilling, sous vide a heap of chicken breasts ahead of time and have them waiting in the fridge. Fire up your barbecue or grill and coat the chicken in barbecue sauce or honey and soy sauce. Grill just until it’s sticky and browned and heated through, then serve with salad.
I hope next time you need chicken for a salad, soup, sandwiches or pasta, you think about cooking sous vide. It’s super easy and more approachable than you would imagine, plus your chicken will stay juicy and tender.
Happy steam oven cooking, see you here again soon.
Do you want to use and love your steam oven more?
Steam Oven Insiders is a membership for steam oven cooks who’d like to know, use and love their combi steam ovens more.
In addition to an ad-free experience across the entire Steam & Bake website, Insiders also get exclusive access to a growing library of premium content, from recipes (always!) to downloadable cooking charts and guides, seasonal steam oven cooking ideas and more, delivered straight to your inbox in a helpful and inspiring twice-monthly newsletter.
As an Insider, you get the opportunity to shape the content published here, by requesting recipes and asking your curly steam oven cooking questions.
Not ready to become an Insider just yet? I hope you’ll still enjoy the hundreds of free recipes and articles across the Steam & Bake site, and that you’ll consider joining us in future.

Sous Vide Chicken Breast
Ingredients
- 2 chicken breast fillets about 6oz/180g each
Instructions
Method 1 (slower, single temperature, hands off)
- Preheat your oven to 149°F/65°C, steam setting (100% humidity).
- Lay the chicken out in a single layer on a lightweight stainless steel pan, with about 1 inch around each breast so the oven heat can circulate easily (see notes if you want your chicken seasoned prior to cooking).2 chicken breast fillets
- Put the pan into the oven and cook for at least 1 hour and up to 4 hours. If your chicken breasts are very thick (like the ones in the video which accompanies this guide!), I’d recommend leaving them for 3-4 hours as it does improve the texture over a 1 hour cook.
- When the chicken is done, remove it from the oven. If you aren’t using it immediately, place it immediately into the fridge to chill. This is really important, people! This chicken hasn’t cooked to a high temperature, remember, so it needs to be chilled as quickly as possible if you plan to keep it and reheat or eat cold later.
Method 2 (faster, variable temperatures, meat probe required)
- Preheat your oven to 164°F/73°C, steam setting (100% humidity).
- Place the chicken, in a single layer, on a lightweight stainless steel pan. Insert an oven-safe probe thermometer into the thickest part of one chicken breast (use your oven’s connected probe if it has one), and cook the chicken until it reaches 142°F/61°C in the center. Depending on the thickness of your chicken this will take anywhere from about 20 to 30 minutes.2 chicken breast fillets
- Reduce the temperature of your oven to 145°F/65°C and continue cooking for 20 minutes. This will ensure the meat is fully pasteurized.
- When the chicken is done, remove it from the oven. If you aren’t using it immediately, place it immediately into the fridge to chill. This is really important, people! This chicken hasn’t cooked to a high temperature, remember, so it needs to be chilled as quickly as possible if you plan to keep it and reheat or eat cold later.
Video
Notes
- You can scale the quantities up or down as necessary here – the temperature and time remain the same. I’ve done as few as one chicken breast and as many as 10; just make sure you lay them out in a single layer with a little space between each breast.
- If you’re unfamiliar with sous vide cooking, you might think the temperature here is way too low to safely cook your chicken. It’s not: proper, safe cooking relies on both time AND temperature to kill any pathogens in your meat. Holding the chicken at a steady 149°F/65°C until the center has been at that temperature for at least 4-5 minutes is just as safe as cooking it at a higher heat until it hits 165°F/74°C, then immediately taking it out of the pan or oven. The big difference? The outside of the high heat chicken will have hit temperatures way above 165°F/74°C in order to get the center to the correct temperature quickly, and will be stringy, graduating to softer in the middle. The 149°F/65°C sous vide version will be cooked to exactly the same doneness (ie juicy, tender and fabulous) edge to edge.
- If you’d like to season your chicken prior to cooking, you can. If I have time, I generously salt both sides of the meat and set aside for 2 hours in the fridge. This is what I’d call a quick dry-brine, and it makes a huge difference to the flavour of the cooked chicken. It’s an especially good idea if you don’t plan to sauce it or warm it after cooking, and means you’ll have well seasoned chicken for a sandwich or a salad. You can also rub on dry spices and herbs if you’d like a particular flavor profile. Just remember that whatever you add won’t brown or reduce down because you’re cooking at a low temperature.
- Want a more traditional grilled chicken finish with browning on the outside? Once your chicken is cooked and chilled, oil it and reheat on a very hot grill just to brown and reheat. Remember it’s already cooked, so hot and fast is key to getting browning without ruining all that juiciness from your long, slow cooking!
- The texture of the cooked chicken is suitable to slice or shred for serving. You can use it cold, or reheat at the same temperature and setting as you cooked at for around 30 minutes, then add it, hot, to another dish.


12 Responses
The low and slow hands off sounds an ideal recipe. Since I’m cooking for one, can you suggest anything else that can share that oven time and temperature? I suspect it will be too low for vegetables?
This is so easy that I cook a batch then loose freeze. Perfect for chicken pie, curry or stir fry.
I can’t believe I’ve had a combi-steam oven for 8 years and it never occurred to me to cook chicken breasts for salads etc using this bag-less sous vide method. Absolutely brilliant recipe! The result was so much better than poaching (which is what I’ve bee doing for years and tend to overcook & dry out). The sous vide method was precise and easy to follow and resulted in juicy and tender chicken breasts. Hooray! On a separate occasion I tried the “dry brine” mentioned in the notes. That yield even better results. There’s no going back to poaching for me.
Chicken thighs need slightly different treatment to breasts. I don’t have a specific guide for these but I use my friend Chelsea’s directions for sous vide chicken thighs over on the ‘A Duck’s Oven’ website.
Does this work for chicken thighs?
Yes, I freeze chicken that’s been cooked this way regularly. It’s not 100% when thawed but it’s still very passable and very convenient! If I know I’m going to freeze it, I’ll sous vide in a bag for ease of storage and to minimize the chance of freezer burn.
Can the chicken be frozen after the sous vide and still retain its juiciness?
Hi Sherry. Yes, for the purposes of your oven, sous vide cooking is basically just steaming but at lower temperatures, so you’ll definitely need to put water in the tank.
Do you fill the water tray in the steam oven as with other steam cooking? There wasn’t mention of that, but you probably assumed that should be known. I am very new to the LG Signature wall oven, so I am just learning my way around using the steam setting. Thank you for the informative site, recipes, and help.
I’ve always worked with ovens that have an included probe, or I use an instant-read probe thermometer to check temps of foods when I think they’re near to being cooked (but I don’t leave that in the oven). I’d search for something along the lines of a barbecue probe thermometer if you want something you can leave in the oven – some have a standalone heat safe probe that goes into the meat/food, and a remote display with timers, alarms etc.
What brand meat probe do you recommend that can be exposed to moisture, if you don’t have a probe that comes with the oven?
This guide is so helpful! Sous vide chicken breast is one of my favorites because it’s always so tender and juicy. I appreciate the detailed timing and temperature tips, it’s easy to overthink it sometimes. Have you ever tried adding aromatics or marinades to the bag for extra flavor?