


This post includes affiliate links. Find out more about affiliate links and how they help this site.
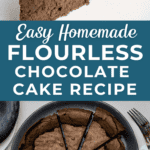
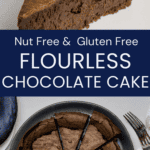
My gluten free, nut free chocolate cake will be the best flourless chocolate cake you’ll ever eat, whether you have food allergies or not.
I’m going to show you how to make this gluten free, nut free chocolate cake that’s so rich and silky smooth, it would do any dessert menu proud. This happens to be a gluten free dessert that tastes best if you bake it a day ahead. That makes it a great recipe if you’re entertaining someone with special dietary requirements, but don’t want to bake a separate dessert.

Why does it have to be a gluten and nut free chocolate cake?
Look, I love all kinds of chocolate cakes and bakes. There’s an entire chocolate dessert index on this site. I have a fantastic Simple Chocolate Cake recipe that I make all the time, and which is decidedly not gluten or nut free.
But this unassuming number is one of my very favorite chocolate cakes to eat. It happens to be both gluten and nut free, and that’s just a bonus.
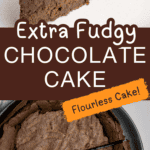
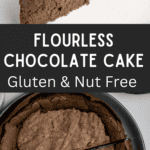
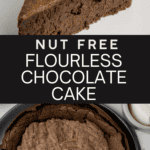
Gluten free, nut free chocolate cake is partway between cake, pudding and brownie, and includes the best bits of all three. It’s got a brownie-like crisp, crackly layer on top. A super soft and rich pudding textured interior, and it still manages to slice and serve as a very pretty cake.
Nut free flourless chocolate cake needs a little more attention than a regular chocolate cake, but you’ll be duly rewarded. You’ll have a dessert that’s rich, smooth and silky, and tastes cleanly of pure chocolate. You may not want to share!
The best ingredients for gluten free nut free chocolate cake
This is a gluten and nut free chocolate cake, which is kind of unusual. Most gluten free chocolate cakes rely on ground almonds or hazelnuts to bring body and heft. Here there there are no ‘filler’ ingredients like nuts or gluten free flour. That means nothing for the flavors to hide behind. You’re going to taste the quality of butter, cocoa, vanilla and chocolate, so if there was a time to spring for the good stuff this is it.
Choosing chocolate for baking
When it comes to choosing chocolate, a lot of brands, including some of the supermarket ones, now print the percentage of cocoa solids on the package. This is great for consumers because it means you know exactly how dark the chocolate you’re buying is going to be.
For the chocolate in this nut free chocolate cake recipe, I recommend something in the region of 50-70% cocoa solids. Anything less will put you into milk chocolate territory, where dairy is added to the chocolate and the flavour is too mellow and sweet. Much higher than 70% will leave you with a cake that’s too dark and not sweet enough for the average person to enjoy.
I use a Callebaut 54% dark chocolate for most of my baking, although I have also used a 62% dark in this cake and it was great. The Callebaut is great quality and it’s easy for me to buy in a large block and chop into chunks whenever I need it. I find it better than keeping chocolate chips around. With chips, I may be known to munch my way through the bag a little at a time when I can just grab a handful. Removing easy temptation is worthwhile if I want to retain any semblance of healthy eating!
Choosing the right butter for baking
The butter you use in your gluten and nut free cake shouldn’t have too much water in it. This might sound odd if you’ve never looked at the ingredients on a package of butter!
In the USA and Australia (and many other countries), regular butter contains around 80% butterfat. Most of the other 20% is water, because, well, water is cheaper than butter!
For a lot of recipes it doesn’t make too much difference, but in baking I like to use a higher fat European style butter, which contains around 85% butterfat. The extra water in non-European butters can change the texture of your baked goods. This is especially true when it comes to rising of batters, because water evaporates within the food and leaves air pockets.
Choosing the best vanilla for your cake – extract, paste, essence or whole beans?
This gluten free chocolate cake recipe calls for vanilla extract or paste. The type of vanilla you use IS important, even though you’ll only be using a tiny bit of it. Here’s what you need to know:
-
Vanilla essence, which is chemically produced, is the cheapest vanilla flavoring on the market and tastes (to me, at least) pretty yuck.
-
Vanilla extract is just that – whole vanilla pods from which the flavor and aroma has been extracted. It’s sold in liquid form, like vanilla essence.
-
Vanilla paste is the vanilla beans and sometimes pods, ground into a fine paste.
Either extract or paste is fine in your nut free cake, or if you really want to go all out, split a whole vanilla pod and scrape the seeds directly into your cake batter. Please don’t use vanilla essence (ever). It leaves a strange chemical aftertaste to your baked goods; I honestly don’t think anyone who makes the effort to bake a nice cake or cookie wants that.
Choosing the best cocoa (or cacao) powder
I use Dutch processed cocoa in almost all recipes calling for cocoa. It’s the most stable and has the smoothest taste and texture. If you’d like a short lesson in the types and differences between cocoa and cacao powders so you can make your own decision, read on.
Cocoa powder is unsweetened and comes from the fermented, dried, roasted and finely ground beans of the cacao plant.
In recent years raw cacao powder (also unsweetened but from cold pressed, unroasted cocoa beans), has become more widely available. It has a great reputation as a superfood ingredient rich in antioxidants, magnesium and many other beneficial trace elements.
Cacao retains more nutrients than cocoa because it’s not heated in processing. Although it can be interchanged for cocoa in some recipes, it is more bitter and absorbs more liquid than its processed cousin. I haven’t tried it in this recipe but experience tells me it would make for a more densely textured and slightly grainy cake.
Cocoa comes in either a ‘natural’ form or in ‘Dutch processed’ form. Dutch processed cocoa has been alkalized to neutralize the cocoa’s acidity.
The difference between alkalized and natural cocoa can be really important to some recipes, although it’s not critical to the success of this one. The alkalizing process affects the way cocoa interacts with other ingredients, especially leaveners like baking soda and baking powder. Baking soda requires an acid in order to form the chemical reaction that makes a batter or dough rise. If you were to use alkalized (Dutch) cocoa in a recipe calling for natural cocoa, you’d get a flatter result unless you added another type of acid in the form of, say, lemon juice or vinegar.
Do you want to use and love your steam oven more?
Steam Oven Insiders is a membership for steam oven cooks who’d like to know, use and love their combi steam ovens more.
In addition to an ad-free experience across the entire Steam & Bake website, Insiders also get exclusive access to a growing library of premium content, from recipes (always!) to downloadable cooking charts and guides, seasonal steam oven cooking ideas and more, delivered straight to your inbox in a helpful and inspiring twice-monthly newsletter.
As an Insider, you get the opportunity to shape the content published here, by requesting recipes and asking your curly steam oven cooking questions.
Not ready to become an Insider just yet? I hope you’ll still enjoy the hundreds of free recipes and articles across the Steam & Bake site, and that you’ll consider joining us in future.
How to make flourless gluten free, nut free chocolate cake
Now that we’ve gone into minute detail about ingredients for this gluten free chocolate cake, let’s talk about how to bake it!
The key techniques here are separating and whipping egg whites to meringue consistency, and folding batter and meringue together. The rest of this cake basically just requires melting and mixing ingredients. The egg whites are the difference between a totally flat and heavy cake and a dense yet soft-textured one. If you have a stand mixer, or a whisk and some good arm muscles, this is all fairly straightforward.
Separating and whipping egg whites
First you’re going to separate your egg yolks from the whites. The whites need to be completely free of any yolk in order to whip properly. Even a tiny trace of egg yolk will leave you with flat meringue.
If you’ve never separated an egg before, work with cold eggs straight from the fridge. They’re easier to deal with. Gently crack the egg, then hold it upright in one hand. Lift off the top half of the shell, allowing the white to spill into a bowl underneath. Tip the yolk and any remaining white into your free hand, and let the excess white run into the bowl. Pop the yolk into a separate bowl, and continue on until all your eggs are done.
If any yolks break, carefully fish the yolk bits out (or start again). If you’re worried about broken yolks, separate whites into a different bowl and then tip them into the mixer bowl as you go. Then if you lose one egg white to a broken yolk, you won’t have to start from scratch.
When it’s time to whip those egg whites, you first want to get them to a soft peak consistency. You’re aiming for something that looks like bubble bath. Small, even, visible bubbles, and when you lift a whisk or mixer out of the egg, it should softly droop down onto itself. Have a look at the image below to see what I mean.

When your egg whites are at soft peaks, it’s time to start adding the sugar. Add a couple of tablespoons at a time, with the mixer running. If you’re whisking and have someone else you can call on, get them to gradually add the sugar while you keep whisking. As the sugar is incorporated, the egg gets fluffier and increase in volume. By the point all the sugar has gone in, it should look glossy, thick and foamy, There will be no visible bubbles, and it should hold stiff peaks when the whisk is lifted up. If you rub the mixture between two fingers, it should feel smooth, not gritty. If it is gritty, beat for a little longer to dissolve the sugar).

Folding egg whites into cake batter
When you’ve made the chocolate batter and beaten your egg whites into meringue, it’s time to put them together.
Don’t just dump everything in one bowl and mix enthusiastically! You’ll lose all the airy texture of the egg whites. Instead, you’ll mix a little of the meringue into the flourless cake batter to loosen it, and for the rest you’ll fold it in. Gently.
Folding egg whites into a cake is best done with a wide, flexible spatula or a large metal spoon. These can scoop under and around the mixture without being too heavy and deflating the whites. Stop folding when you no longer see streaks of egg white or darker, unmixed chocolate batter. The mixture may not look completely smooth, but as long as everything is incorporated that’s fine.

My gluten free chocolate cake sank after baking!
Don’t panic. It’s meant to do that. In fact, I’ve seen this cake referred to as sunken chocolate cake before, which is quite apt.
Most cakes, or at least the ones with leavening agents in them, rise somewhat in the oven. The air bubbles which create that rise get ‘locked in’ when the egg protein binds with the gluten you’ve put in there.
In the case of a gluten free, nut free chocolate cake, there’s no flour, and nothing much to hold that structure high. So although your cake is going to puff up like a beautiful souffle in the oven, it’ll gently sigh its way down after baking.
Instead of a cake batter that doesn’t rise at all, this one does get some leavening action from the air you whip into the egg whites. It’s not going to be completely dense and fudgy but somewhere in between. It has a smooth texture you’ll never get from a flour-based cake, and a thin, crackly meringue-like top.
Got sweet tooth for chocolate cakes? Whip up these delightful recipes:
Simple Steam Oven Chocolate Cake
12 Minute Brownies with Salted Peanut Butter Frosting
Four Ingredient Chocolate Truffle Cake
How to slice and serve a flourless nut free chocolate cake
After all your hard work, you want this to be the perfect slice of cake when you serve it up, right?
If you want the cake to taste its best, don’t serve it cold. Room temperature or slightly warmed will bring out the flavour of the chocolate; the flavours and aromas of chocolate are dulled by cold. If you’ve invested in great chocolate for baking don’t waste that investment.
Here’s the rub when it comes to serving a flourless chocolate cake, though. The best way to get a clean slice is to cut a cold cake! Flourless cakes are hard to cut nicely because they can be quite sticky, and this one is no exception.
If you aren’t too worried about a clean cut, keep your cake at room temperature. Use a heated knife that’s wiped off between each cut. It’ll still look good and once people taste it, no one will be complaining that it wasn’t as neat as it could be!
If you really want to serve perfect looking slices, chill your cake. Remove it from the fridge at least half an hour before you want to serve. Cut the cake straight from the fridge; when it’s time to serve, it will have warmed up and be easy to put beautiful slices on your plates.
I hope you’ll try my gluten free, nut free chocolate cake recipe. It’s a keeper; all the more so because it’s so allergy friendly.
Happy cooking, see you here again soon.


Flourless Chocolate Cake (gluten free, grain free, nut free)
Ingredients
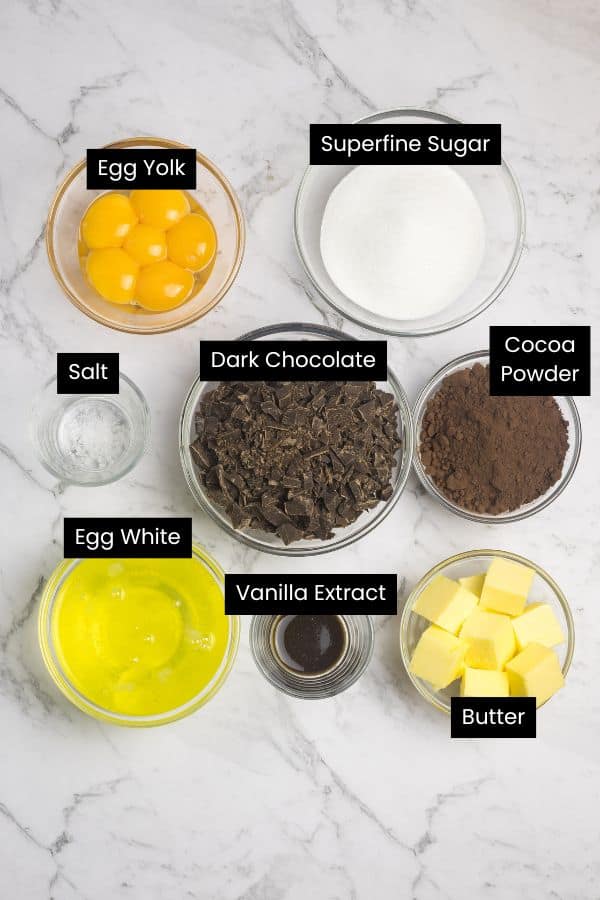
- 11 tbs unsalted butter 2/3 cup, softened
- 10 oz dark chocolate finely chopped (I use Callebaut 54% dark)
- 6 eggs large, separated
- 2/3 cup Dutch process cocoa powder (alkalized cocoa), sieved
- 1/2 tsp salt
- 1 tsp vanilla extract or vanilla paste
- 1 cup superfine sugar caster sugar
Instructions
- Preheat oven to 180°C/350°F. Use 1 tbs of your butter to rub all over the inside of a 22cm/9in springform pan, then line the base and sides of the pan with baking or parchment paper (the paper will stick to the butter and stay put).11 tbs unsalted butter
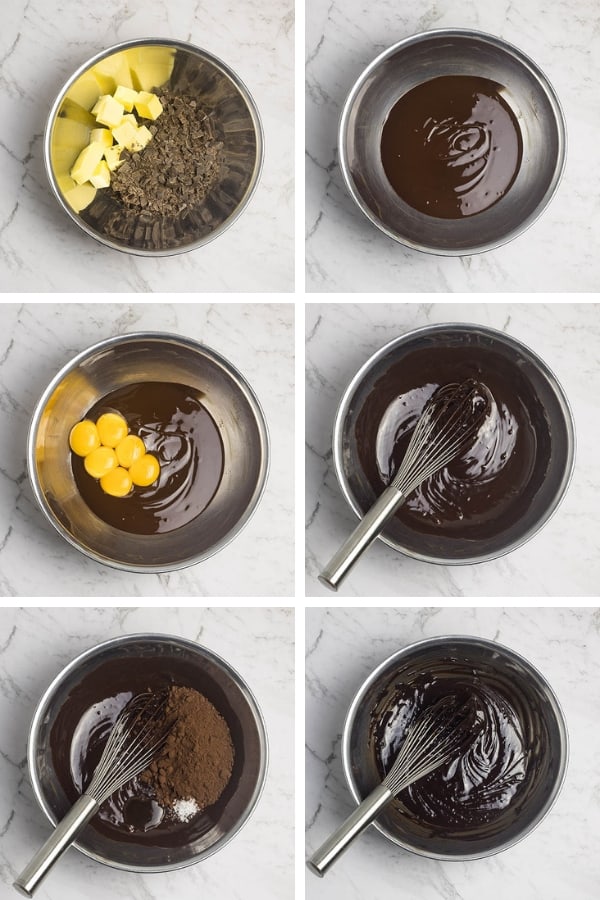
- Place the remaining butter and the chocolate into a large heatproof bowl. Set the bowl over a saucepan with a couple of inches of water in the bottom (make sure the water doesn’t touch the bottom of the bowl), and place the pan over medium heat so the water comes just to simmering point. Melt the butter and chocolate, stirring every now and then, until it’s completely smooth, then remove from heat and allow to cool for a few minutes so the mixture is lukewarm.10 oz dark chocolate
- Using a whisk, mix the egg yolks into the cooled chocolate and butter. Add the sieved cocoa powder and salt and whisk well to combine, then whisk in the vanilla.6 eggs, 2/3 cup Dutch process cocoa powder, 1/2 tsp salt, 1 tsp vanilla extract
- Put the egg whites into the bowl of a stand mixer fitted with the whisk attachment (you can do this step by hand with a large whisk, but you’ll have to get your arm muscles ready!). Whisk on medium-high speed just until the whites form very soft peaks when you lift the whisk.
- Reduce your mixer speed to medium and slowly begin adding the sugar to the egg whites. Continue whisking and adding the sugar a couple of tablespoons at a time, until the sugar is used up and the mixture forms glossy, stiff peaks when you lift the whisk. If you rub a little of this mixture between your fingers it should feel smooth, with no grittiness from the sugar at all.1 cup superfine sugar
- Using a metal spoon or a spatula, stir about a quarter of the egg white mixture into the chocolate mixture until combined. Then, working gently, scoop the rest of the egg white mix into the chocolate bowl and fold together until everything is just mixed and there are no streaks of egg white. The aim is to keep as much air in the batter as possible, so don’t overmix.
- Gently pour the batter into the lined pan and smooth the top. Bake until the cake is set and barely risen, with a thin crust on top, about 35 minutes. It will not test clean with a skewer, but should be set enough that it doesn’t jiggle when you move the pan.
- Cool the cake completely in the pan before removing and serving in thin slices with extra melted chocolate and thick cream or ice cream.
Notes
- Serves 10.
- I know I’m going to get questions about this, so let’s clear it up now: no steam oven required for this recipe! This is designed for a regular or convection oven, so anyone can give it a go. 🙂
Nutrition
Over to you – if you try this recipe I’d love to know about it! Share your comments below or on Facebook, tag @steamandbake on Instagram, or pin all your favourite Steam and Bake recipes to Pinterest using the buttons on the images in this post!
Would you like more recipes and tips to help you cook with confidence? Join the mailing list to be alerted to new posts.


")


9 Responses
Hi Toni. This is an either/or measurement – 2/3 cup is the same as 11 (US) tablespoons of butter, so it just depends which way you prefer to measure.
In my printed recipe I see 11 tablespoons of butter/ 2/3 cup, softened. I am not sure how much butter to use.
Yep, you absolutely could! If you want to do it uncovered, use a very low heat (104F/40C) dry setting (no steam – many ovens won’t consistently hold a low enough temp without the steam, though). If your oven won’t hold a dry heat at that temperature, you can cover the bowl VERY well and use your steam or sous vide setting at the same temp.
Could you use the steam oven to melt the chocolate and butter? Thanks Meg
Excellent taste and great desert for gluten free eaters.
Have been looking for such a recipe since losing one that I made years ago for my gluten-intolerant son. Can’t wait to try it out – thank you! (And I’m glad you put the disclaimer at the bottom re no steam – I was momentarily confused as to where the steam oven came in. 🤣)
This was a big hit with my chocolate loving friends. One commented it was just like the cake they had in a restaurant. Easy and good for gluten-free friends.
This was a big hit with my chocolate loving friends. One commented it was just like the cake they had in a restaurant. Easy and good for gluten-free friends.
Thanks Emily
We are gluten free now at home for a Coeliac.
I’m giving this great recipe a go tomorrow.
Love your steam and bake, greatly appreciated.
Mary