


The Basque burnt cheesecake seems to have taken the social media world by storm recently.
It seems that everywhere I look at the moment I see this burnished, golden-topped cheesecake, and eventually I had to give in to peer pressure and delicious looking photos and try it for myself.
I’m not sure why I waited so long. This is a dream of a dessert, silky and smooth on the inside and with a toasty caramelized top that works so well with the creamy filling.
While it works just fine in a regular oven, a burnt cheesecake is also great candidate for combi steam ovens. The addition of humidity makes it cook faster, brown very evenly and retain a really silky texture.
As an Amazon affiliate I earn from qualifying purchases. This post may also contain other affiliate links, which means I may earn a commission if you click through and make a purchase, at no additional cost to you.
Why is it called Basque cheesecake?
Burnt Basque cheesecake is reportedly the brainchild of chef Santiago Rivera of La Viña in San Sebastian. He is said to have come up with the dessert in the early 1990s.
I’m not sure how Rivera came up with the idea; perhaps it was an accident or maybe he just knew the play between the creamy, sweet filling and the nutty burnt-sugar top would be a match made in foodie heaven. Whatever the reason, I’m glad for the innovation and even more so for how simple it is to make!
If the origin story is true, the burnt cheesecake has taken 30 years to hit the internet headlines, but I hope it sticks around now that it’s here. I can tell you it will be made in my kitchen over and over again now that I’ve discovered it.
Do you love cheesecake as much as I do?? Try these other steam oven cheesecake recipes!
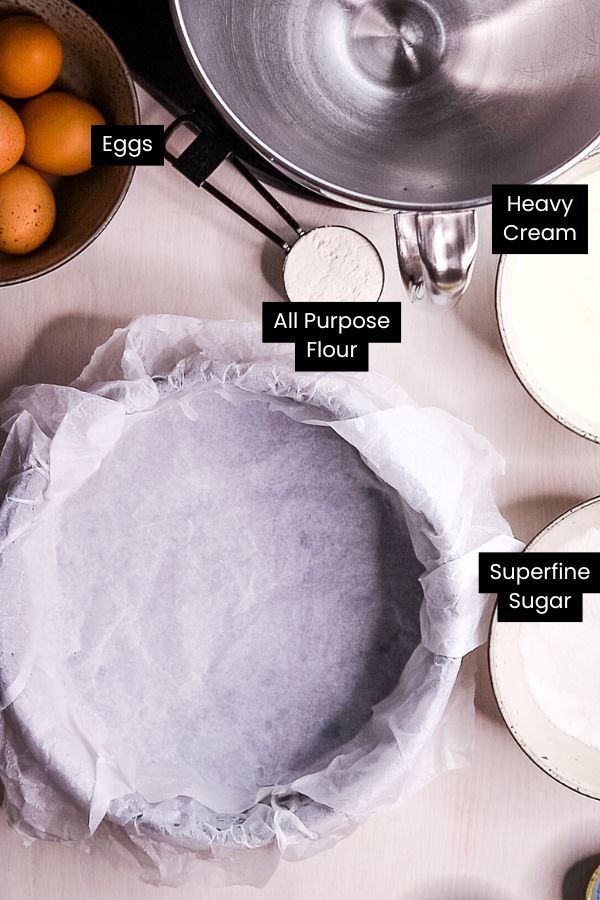
Ingredients for a burnt cheesecake
The classic burnt Basque cheesecake uses a pretty standard cheesecake filling; namely cream cheese, sugar, eggs and cream. A little flour gives the batter stability and helps bind the ingredients without making the whole thing too eggy.
This is a crustless cheesecake, so you literally just mix everything up and pour it into the pan for baking. I thought I’d miss the crust but the burnt top gives enough of a taste and texture difference that I honestly didn’t.
I’ve seen many variations on this recipe while researching and testing to come up with my own version. I like to scent my cheesecake with vanilla but I’ve also made it with lemon zest and juice to give it a really bright citrus flavor.
Once you’ve tried the basic recipe it would be easy to make your own version, adding different flavoring extracts, berries, coffee or chocolate to the filling.

Do you want to use and love your steam oven more?
Steam Oven Insiders is a membership for steam oven cooks who’d like to know, use and love their combi steam ovens more.
In addition to an ad-free experience across the entire Steam & Bake website, Insiders also get exclusive access to a growing library of premium content, from recipes (always!) to downloadable cooking charts and guides, seasonal steam oven cooking ideas and more, delivered straight to your inbox in a helpful and inspiring twice-monthly newsletter.
As an Insider, you get the opportunity to shape the content published here, by requesting recipes and asking your curly steam oven cooking questions.
Not ready to become an Insider just yet? I hope you’ll still enjoy the hundreds of free recipes and articles across the Steam & Bake site, and that you’ll consider joining us in future.
How to make a burnt Basque cheesecake
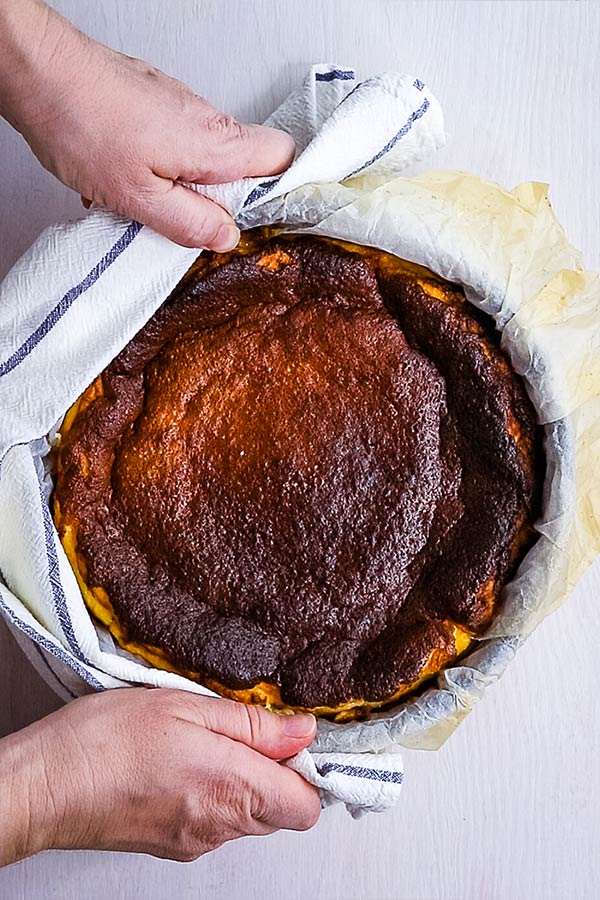
The first thing we’ll do is preheat the oven and line the pan. I’ve discovered a trick with lining the pan for Basque cheesecake. The cake is meant to be rustic and imperfect on the outside, so the lining can be imperfect too. The easiest way to do this is to screw the parchment paper into a ball and run it very briefly under a tap.
Dampening the parchment is something that’s done for casseroles, where a circle of scrunched-and-then-flattened parchment is put on top of the food in the pot. Wetting the paper a little helps to retain moisture in the food and prevent the paper cover from drying out and burning. It also allows it to be much more pliable and flexible when you unscrunch. In the case of our cheesecake, it’s much easier to press the parchment into the pan.
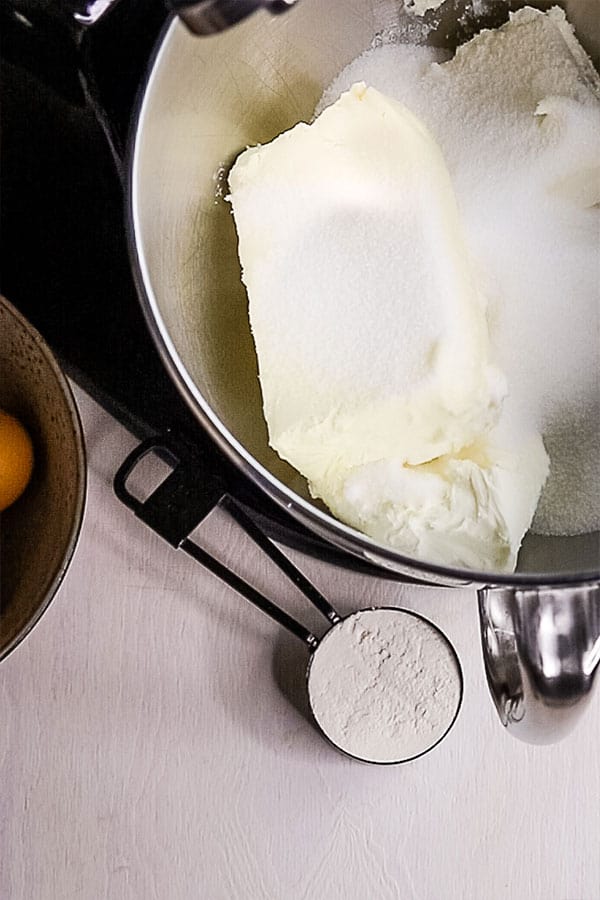
Now we get onto the making of the cheesecake itself. Make sure your cream cheese is at room temperature, it will become smoother much faster when you’re mixing the batter.
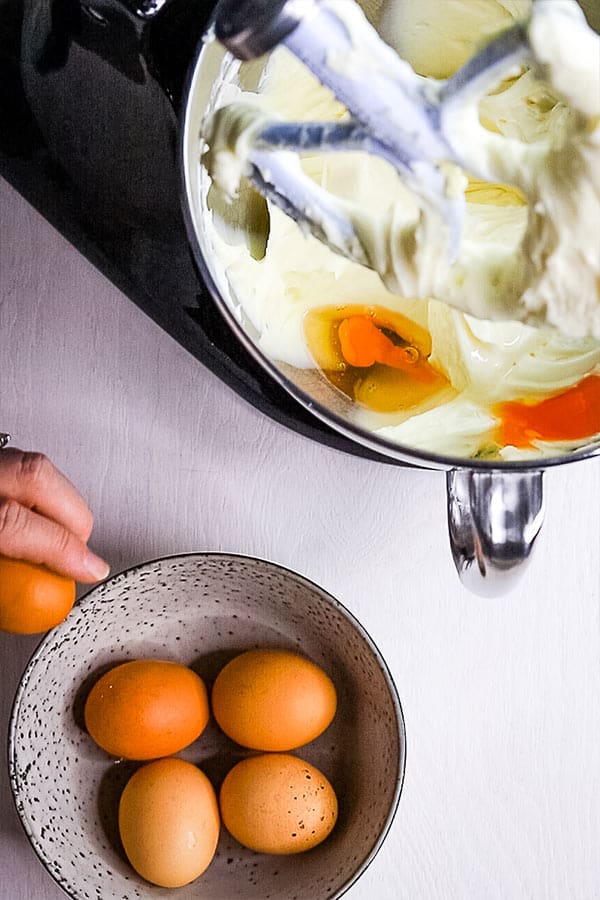
Mix the cream cheese and sugar until smooth, then add the eggs 1 or 2 at a time, mixing well to make sure they bind with the cheese before adding the next.
Add the remaining ingredients and mix on low until the batter is smooth.
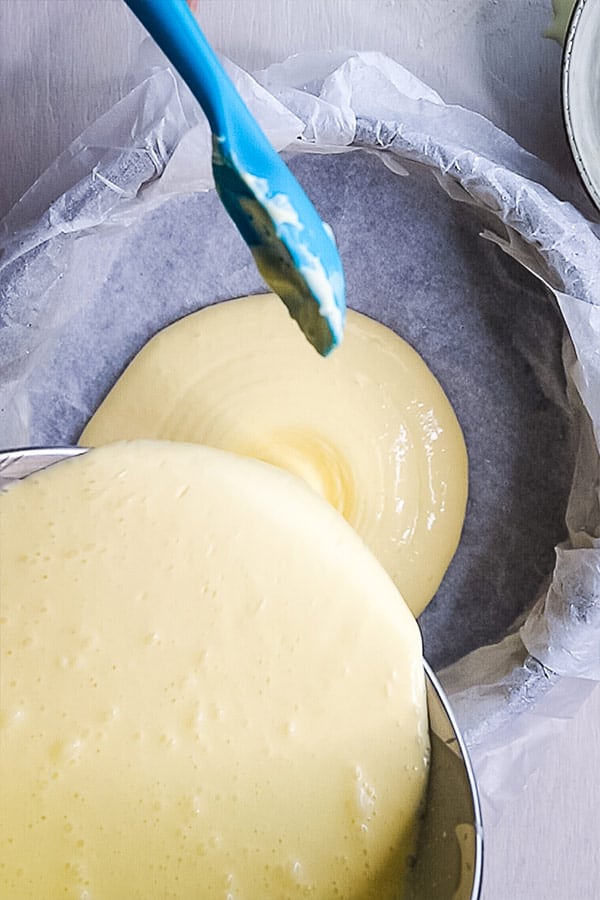
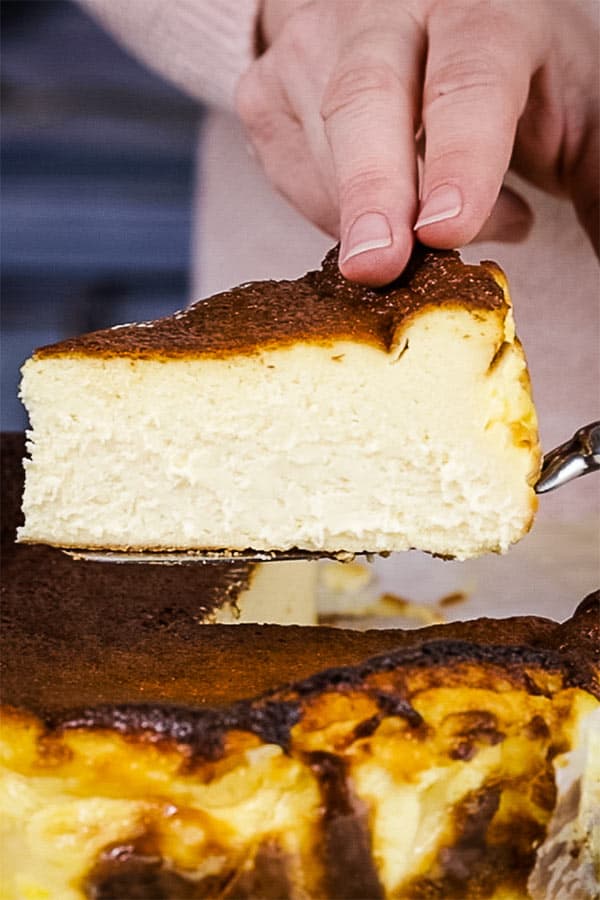
Pour the Basque cheesecake batter into the prepared pan and cook until it’s jiggly and well browned on top. It will be very puffy when you take it out of the oven, and will seem wobbly and undercooked. Don’t worry! The puffiness sinks down into a dense, custardy texture and the wobbly center will set when you chill the cake.
Cool the cheesecake at room temperature for a couple of hours, then put it into the fridge overnight. If you skip this extended chilling time cheesecake won’t set properly – don’t say I didn’t warn you! I know it’s tempting to cut into it early, but if you cut too early the center will spill out.
There you have it. I hope this cheesecake will become a regular feature in your dessert repertoire. It’s a perfect bake-and-take dessert because once chilled it travels really well. It keeps for 5 or 6 days in the fridge, so you can bake during the week for a no-effort special dessert on the weekend.
Happy steam oven cooking, see you here again soon.
Have you made and enjoyed this recipe? I’d love if you’d be kind enough to rate and review it via the stars in the recipe card, and leave a comment below! Ratings and reviews help other readers to find and understand my recipes from a reader’s perspective.
Basque Cheesecake
Ingredients
- 2 lb cream cheese full fat, room temperature
- 1 1/4 cups superfine sugar caster sugar (granulated will work in a pinch)
- 6 eggs
- 2 cups heavy cream
- 1/2 tsp fine salt or 1 tsp Kosher salt
- 1 vanilla bean split and seeds scraped (replace with 1 1/2 tsp vanilla extract if you don't have a bean)
- 1/4 cup all-purpose flour plain flour
Instructions
- Preheat oven to 400°F/200°C, combi steam setting. If your oven has variable steam settings, select 30% (if not, don't worry! Just set to combi steam at the correct temperature and the oven will take care of the humidity for you).
- Use two layers of parchment paper (baking paper) to line a 9 inch (23cm) round springform pan, overlapping the two layers and scrunching them into the pan and up the sides. I do this by scrunching the paper into a ball and then flattening it out again so it's more flexible to push into the pan. You don't need to get the paper smooth, it should be 'intentionally rustic'.
- Put the cream cheese and sugar into a stand mixer with the paddle attachment fitted. Mix on medium speed until well combined and smooth, scraping down the sides as necessary.2 lb cream cheese, 1 1/4 cups superfine sugar
- Add the eggs, one at a time, with the mixer running. Mix each one in completely before adding the next.6 eggs
- Add the remaining ingredients and mix on low speed until completely combined. Don't mix longer than necessary as you don't want to aerate the mixture too much.2 cups heavy cream, 1/2 tsp fine salt, 1 vanilla bean, 1/4 cup all-purpose flour
- Pour the batter into the prepared pan and place into the preheated oven. Cook until the cheesecake is dark brown on top, puffy and very wobbly, approximately 55 minutes.
- Cool the cheesecake to lukewarm on the counter; it will sink significantly in the center as it cools, this is normal.
- Refrigerate the cheesecake for at least 8 hours or overnight to set. It needs to be completely cold before serving.
- To serve, slice with a hot knife, cleaning the blade between each cut to get nice clean slices.
Notes
- The cheesecake needs no adornment but if you really wanted to up the ante you could add a scoop of double or clotted cream on the side.
- This cheesecake will keep, chilled and covered, for up to 5 days. It can be frozen, well wrapped, for up to 2 months. Thaw overnight in the fridge before serving.
- The original version of this cake, as best I can tell, contained no vanilla, but I love the fragrance it adds. You could omit it if you prefer, or use the finely grated zest of a lemon instead.


12 Responses
I’m so glad you enjoyed it! Thanks so much for leaving a comment and rating, it’s really appreciated. 🙂
This recipe works perfectly – a delicious decadent dessert
This is a fantastic Basque Cheesecake recipe! I have made it at least six times and it always comes out perfectly! I have a Wolf steam oven and use the convection steam setting at 400 F with excellent results! I tent the cheesecake with foil after it cooks for about 43 minutes as the top is usually dark enough for me by then. I still bake it for the full 55 minutes. Make it a day ahead of when you want to serve it so it can thoroughly chill at least 8 hours in your refrigerator. It is tempting to cut it sooner, but you’ll be glad that you waited, enjoy!
I love this cheesecake! Perfect recipe, works each time.
I’d use Convection Humid in a Wolf oven. The steam helps the cake cook evenly and somewhat faster than with dry heat. I find this makes the interior texture more even and silkier.
I have a Wolf CSO. Would you use Convection Steam or Convection Humid at 400°? My regular basque burnt cheesecake recipe bakes at 450° convection (no steam). How would baking with steam differ in the result? Thanks.
I haven’t tried it as individual cakes, but I can’t see why it wouldn’t work. You’d just need to have the oven hot enough (ie maybe a little hotter than the recipe states) to brown the exterior without overdoing the insides. I’d love to know if you give it a go!
Have made this and it is amazing! I am now thinking of making individual cheesecakes using a cupcake sized pan. Any suggestions on cooking times & temperature? Thanks 😊
Tried this for the first time last night. Can’t believe how easy it is and it turned out really well (my friends that tried loved it). Love this recipe! Thanks!
Tried this cheesecake yesterday. I’m in a two person household so I decided to half the recipe so we wouldn’t go to overboard!
It fit nicely in a 7″ pan, cooked for 40 mins total. Thank you, this was so creamy and delicious!!
possible game changing cheesecake. I love a good, creamy cheesecake and was slightly skeptical about this recipe. Silly me! Followed the recipe exactly except I used gluten free flour since my husband is celiac. As noted in the recipe, it is SO tempting to cut into the cheesecake once it comes out of the oven but we resisted the temptation. This sat in the fridge for a full day and set up nicely. It is very tasty, even my 86 year old mum (whose cheesecake recipe is my go-to cheesecake recipe!) loved this. As did my daughter who loves my chocolate cheesecake (she had 2 pieces of this cake). Highly highly recommended this recipe.
This cheesecake is absolutely delish! I don’t miss the crust at all, and it’s so easy! I love making the cake plain and making a variety of sauces to top off with, chocolate, cherry, strawberry etc. Thank you Emily for another amazing recipe!