


If you ever peek at internet search terms for steam oven cooking, ‘bread steam oven’ is far and away one of the top 3 things people look for. If you’ve landed here, then, it’s pretty much a given that you want to know how to bake bread in a steam oven.
I want to show you that baking amazing steam oven bread at home is not only achievable, but simple. I’m going to walk you through all the main points of proofing and baking today, so you can use your home oven to get the best results you’ve ever achieved.
You can apply my steam oven bread tips to get great results from just about any dough, but I’m also sharing a bread recipe recipe for my favorite simple loaf, a sandwich bread with honey and oats.
Want more bread, steam oven style? Check out my Breads recipe index.
If you’d love to know more about sourdough bread in a steam oven, become one of my Steam Oven Insiders, where I’ve covered the topic at length. A sourdough loaf is a different beast to faster-rising yeasted breads, and requires a different approach.
Why bake bread in a steam oven anyway?
Bread in a steam oven is not new; in fact large bakeries have used combi steam commercial ovens to make their products for years.
Having a steamy environment combined with a hot oven allows the surface of the bread to form a crust more slowly, and that in turn lets the dough expand to its fullest, creating maximum oven spring and a lovely texture.
If you’ve ever baked a loaf of bread using a covered Dutch oven inside your regular oven, you’ll likely have had good results. The Dutch oven, with its sealed, heavy lid, allows for bread to rise without all the moisture in the loaf evaporating off too quickly and setting the crust before the proofed dough has expanded properly.
Well, think of a steam oven like the Dutch oven method but much, much easier and more consistent! Combi steam gives you humidity like a Dutch oven during the baking process. It’s better, though; there’s no need to preheat a heavy pot and transfer your loaf into it. And you can see it while it bakes. I love being able to watch bread rise and brown through the oven door, so I can remove it when it’s got the perfect dark brown crust color.

What do you need for steam oven bread baking?
I don’t think I need to tell you that a combi steam oven is necessary here, right? 😉 But if you’re here wondering about what kind of steam oven is best for bread baking, the answer is: the one you have, or the one you’re going to buy. I’ve baked bread in dozens of different combi steam ovens. Really, from a tiny little Cuisinart countertop model right up to the most expensive plumbed-in Gaggenau ovens. They all make fantastic bread once you’ve tweaked the settings to your own preferences.
If you haven’t bought a steam oven and aren’t sure where to start, try my post on The 8 Best Countertop Steam Ovens, or on Designing a Kitchen with a Steam Oven.
As well as a steam oven, you’ll need the bare basics of bread-making:
- flour (I recommend strong/high protein bread flour for most breads)
- yeast (active dry, instant or fresh, depending on your recipe)
- salt
- water
- a large bowl for mixing and proving
- a baking tray, loaf pan or baking stone/steel
A stand mixer with a dough hook is also useful, but not necessary if you only make occasional loaves. If you’re a regular bread baker it reduces the workload of mixing and kneading significantly.
My best tips for great bread in a steam oven
There are several things I’ve discovered in my years of baking bread steam oven style. Here are the key elements of a truly wonderful loaf that you can repeat consistently. These tips hold true for a simple loaf or dinner rolls, through to complex artisan bread made with enriched doughs.
Watch the proving time
Did you know you can prove dough in a steam oven as well as using one to bake?
Many steam ovens offer a dough proving function, which gives you a reliable, fast way to get perfectly proved dough every time. The temperature is low and stable, and a little humidity is added. It’s the perfect environment to get a nice rise.
While steam oven proving is excellent, there are two things to look out for: temperature and fermentation.
The TL;DR version is this: If you’re in a hurry go for steam oven proving, but if you can wait, do at least the first rise on the kitchen counter.
Here’s the longer version on proving.
Although temps in dough proving settings are fairly low, they’re still warmer than the average room temperature environment. And yeast microbes are sensitive little things; they feed and grow in a narrow temperature range. Too cold and they’ll be dormant, too hot and they begin to die, which means your bread will never rise.
100-108°F (37-42°C) is the ideal range for instant and active dry yeast to do it’s thing. Most domestic oven dough proving settings work around that range. That will give you a quick rise, around a half hour for dough to bake an average sized loaf of bread. The alternative is around 45 minutes to 1 1/2 hours on your kitchen bench.
The trade-off for a fast proving time is flavor. Many people (myself included) prefer to do a slightly cooler rise because it allows the dough to ferment more slowly. A cooler rise gives the best flavor and texture. 80-90°F (27-32°C) is ideal here, but many steam ovens can’t achieve a steady temperature that low. If yours can, by all means use it!
A special note here to pay special attention to enriched or sweetened doughs. Yeast loves sugar, so sweetened doughs can rise faster than unsweetened ones. Add in a warm temperature and you need to be careful not to over-prove your dough!
Don’t cover when proving your dough in a steam oven
Because steam oven proving settings use humidity, there’s no need to use plastic wrap or a damp towel to cover your dough. Just pop in the uncovered bowl and you’ll be able to keep an eye on the progress of your dough as it rises.
Use a baking stone
It’s not essential, but a baking stone or baking steel makes a huge difference to the oven spring I get from my bread.
If you have a heavy ceramic tile, stone or baking steel, preheat it along with your oven, sliding the dough or the loaf pan onto the hot stone when it’s time to bake. I have a large stone that fits an entire shelf in my oven, and bake a couple of loaves side by side.
A lot of steam, but not for the whole time
To get the best result for your bread, you need enough steam during baking to promote a quick rise. This stops the surface of the dough drying out before it’s risen properly. Starting with a good burst of steam at the beginning of baking achieves exactly this.
I preheat my oven (use whatever the temp you’d normally bake a loaf on). Then I put on on the highest steam level available before I put the loaf in.
Once my bread dough has finished rising and a light golden crust has formed, I switch off the steam and complete my bake in a dry oven.
If your steam oven bakes bread using a dedicated bread setting, you’ll very likely find it begins with steam and finishes dry, just like this.

Finishing in a dry oven gives the best crust formation; you get a chewy crust that’s golden and a little glossy, and not too thin. If your perfect crust happens to be thin and soft, feel free to leave your oven’s steam setting on for the whole bake.
A spray bottle is handy
If you want to up the ante as far as beginning your steam oven bread with a big burst of humidity, mist the outside of your loaf with water before putting it in the oven. If your dough is perfectly proofed and nicely formed, a water spray can also help with forming little blisters on the crust; highly desired by many bakers.
What recipe to use for steam oven bread
Almost any bread recipe can be baked using a steam oven. If you’re new to the process, try out my recipe below for Honey Oat Sandwich bread. It steps you through a lovely basic loaf that can be used for sandwiches or toast. And once you understand the principles and baking settings, you can apply them to any other loaf.
If you want to take things further, I have loads of recipes in the Breads index on the site! There are rolls, loaves, fruit bread, babka and even a lovely (but easy) twisted garlic bread loaf. Every single one has extensive details on baking the recipe using a combi steam oven.
I hope this post has been super helpful and that you’re feeling more confident to bake bread in your steam oven with confidence and excitement. When you give it a try, pop a comment below and let me know how you went.
Enjoy making bread? Check out these irresistible recipes!
Hokkaido Milk Bread Recipe (Easy, Fluffy Japanese Milk Bread)
Sticky Chocolate Buns with Chocolate Glaze
Happy baking, see you here again soon.
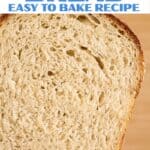
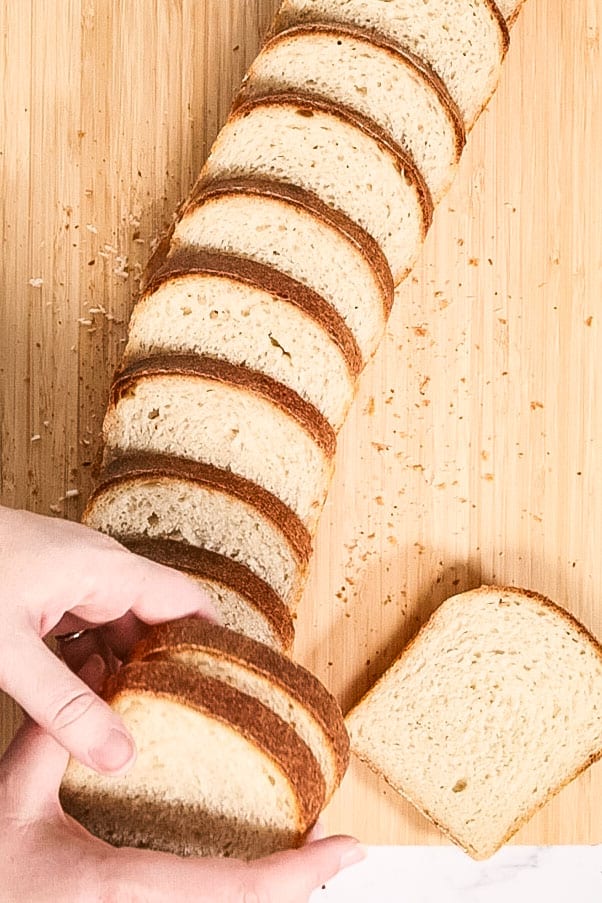
Honey Oat Sandwich Bread in a Steam Oven
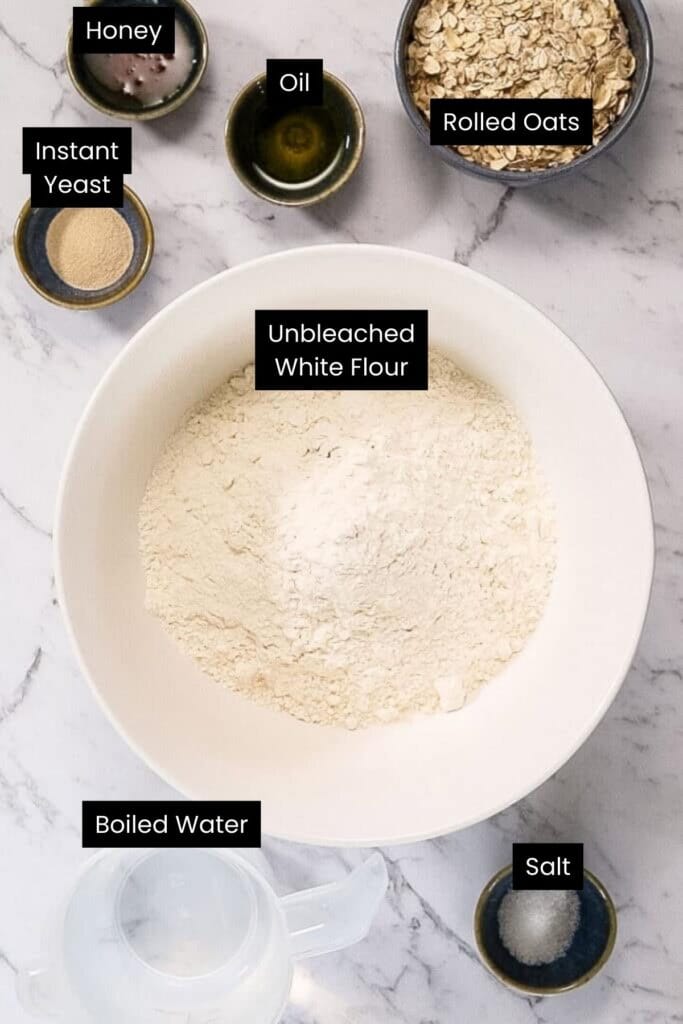
Ingredients
- 1 cup rolled oats
- 2 cups boiling water
- 5 cups unbleached white bread flour around 12% protein is ideal; you can use all-purpose flour but your dough's gluten formation/structure won't be as good.
- 2 tsp instant yeast 1 x 7 gram packet
- 1 Tbsp honey
- 2 tsp salt
- 1 Tbsp neutral flavoured oil I use sunflower or rice bran
Instructions
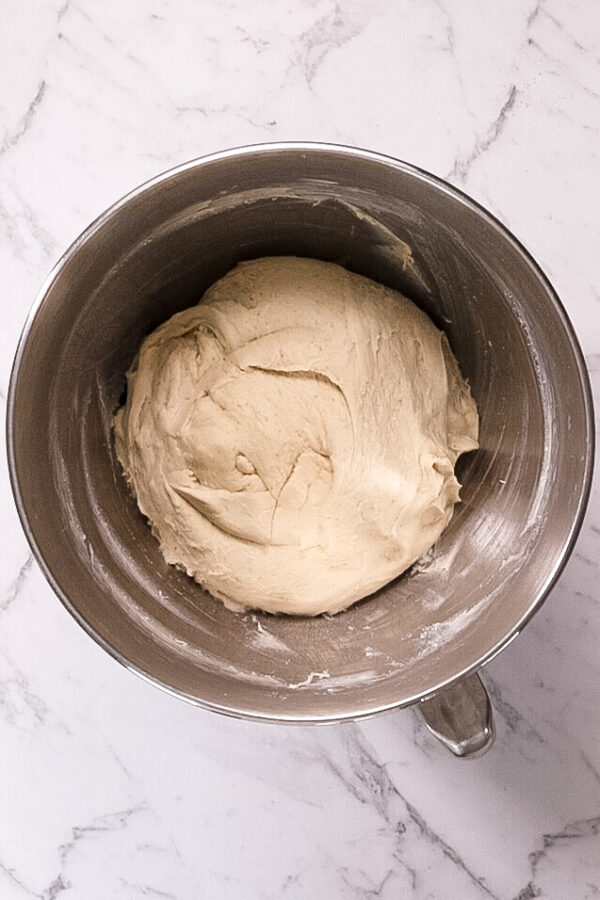
Mix dough
- Put the oats in the bowl of a stand mixer and pour the boiling water over the top. Leave to stand for 15 minutes.1 cup rolled oats, 2 cups boiling water
- Add the rest of the ingredients, fit the bowl into a mixer with dough hook attachment and mix on low speed until a soft, sticky dough forms. Depending on your climate and altitude, you may need a little extra lukewarm water – I add anywhere up to half a cup.5 cups unbleached white bread flour, 2 tsp instant yeast, 1 Tbsp honey, 2 tsp salt, 1 Tbsp neutral flavoured oil
- Turn the mixer to medium-low speed for about 5 minutes, until the dough is a cohesive, fairly smooth mass and mostly pulls away from the sides of the bowl.
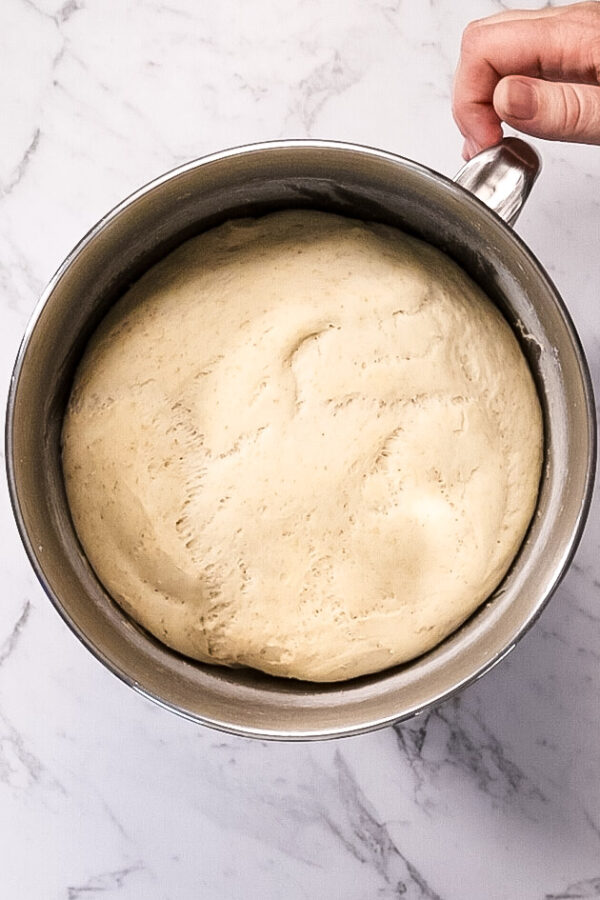
First proof
- Set your steam oven to 95°F/35°C (or, if you can, lower – 82°F/28°C is perfect). Use the dough proving setting if you have one, or the steam setting if you don’t. Put the bowl into the oven until the dough has doubled in size, about 30 minutes. You could turn it into a clean, oiled bowl first but I hate washing up and don’t find there’s any difference in my finished loaf from leaving it in the bowl it was mixed in!
Form the loaf
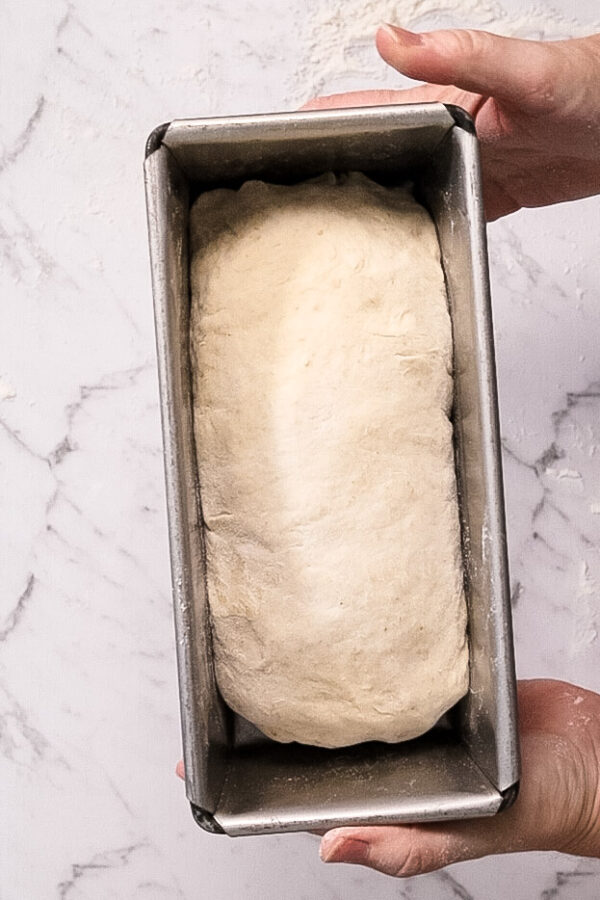
- Scrape the dough onto a floured bench. Gently press it out into a rectangle about 30cm/12” x 20cm/8”. Fold it lengthways into thirds, gently press back into a rectangle, turn it 90° and fold again (you won’t be able to see each one distinctly but you’ll have 9 layers now).
- Lift one of the seam ends of the dough and roll it away from you, tightly tucking it as you go, so you end up with a neat, somewhat loaf-shaped blob a little smaller than your pan. The point of the tight rolling/tucking is to make sure the exterior of the loaf is stretched and smooth, rather than wrinkled or torn. This will give you a nice even rise and a smooth baked loaf.
- Gently put the formed loaf into your pan, seam side down (don’t grease the pan, there’s no need). Tuck the ends down if need be so it looks nice and neat on top. Cover the pan loosely with a plastic shopping bag or a damp kitchen towel.
Second proof
- Either put the covered pan in the fridge for 8-12 hours, or leave it at warm room temperature (20°C/68°F) for an hour. The dough will rise, but this prove is less about size than doneness. When it’s done, you’ll be able to gently press a finger into the dough and it will spring back readily. If your finger leaves a dent, it’s not ready. If your finger makes the dough deflate and sag as soon as you touch it, it’s over-proved (there’s no rescuing over-proved dough, sorry. Your bread is going to have a more open, crumbly texture than a perfectly proved loaf. But if you get it into the oven quick smart you’ll hopefully still have something acceptable).
Preheat oven and bake
- About 15 minutes before you think you’re ready to bake, preheat your oven. Set to 400°F/200°C, combination steam setting. If your oven has variable humidity, use 50%.
- Bake the bread for 12 minutes, then leave the temperature the same but turn off the steam (so you're now just baking with dry convection heat). Continue baking until the bread is dark golden brown on top, about 20-25 minutes longer. If you'd like to be certain it's baked, you can test by internal temperature; an instant read thermometer should read 190°F/88°C in the center of the loaf. I always worry it’s getting too dark on top and am tempted to take it out earlier than I should, so the thermometer test is a great fail-safe.
- Remove the bread from the oven and turn it immediately out of the pan onto a wire rack to cool. It will keep for a day or two at room temperature, however if you’re not planning to eat it all the first day I’d slice and freeze it. Individual slices can be defrosted in your steam oven.
Notes
- Although it contains honey, this is not at all a sweet loaf. The honey gives a lovely aroma, and feeds the yeast.
- The oats break down almost completely but they give a toasty, nutty flavour without the nubbly texture of whole grains or whole wheat flour. Oats are also more easily tolerated by the digestive system than modern wheat, so I like to include them.
- This makes one large loaf as shown or two smaller ones (I use one of these fantastic sturdy loaf pans but if you don’t have one that big just use two smaller/regular sized pans).
- I mix and knead my bread dough in a KitchenAid mixer, so that’s how I’ve written the recipe. You can certainly do it by hand if that’s your preference. You’ll want to knead the dough by hand for 5-7 minutes after bringing it together in the bowl.


16 Responses
Susie, I’m so glad you enjoy my content and you’ve learned from me! If you’re referring to sourdough bread, I have a detailed breakdown of this inside of my Steam Oven Insiders membership. If you aren’t an Insider already you can take a look at the ‘become a steam oven insider’ tab in the main menu for the website. 🙂
Emily. You have been my lifesaver learning how to use my steamoven. Can you recommend steps to make a artisan
Loaf of bread without a pan please. I have a Miele Steamoven. Love it
Thanks you so much
For this bread, I leave the steam on for the first 12 minutes, but for something heavy like a sourdough I’d go longer, up to 20 minutes. Essentially, you want the steam to be present as the dough rises and sets a crust; it helps by delaying the crust formation and allowing the dough to rise to its fullest amount. Some people do bake bread from a cold start in a steam oven (using something like your steam bake setting), and it can work really well. I prefer a preheat but if you bake bread often it’s really worth experimenting to see which way you prefer with your own loaves. Hope that helps.
Hello and thank you for the information on baking with steam. Can you share what steam oven you have, and how long is the steam on before switching to dry heat? I just installed a Wolf steam oven and it’s got a setting for steam bake, which doesn’t preheat the oven, and has a short steam cycle at the beginning. Thanks for your assistance!
Sorry to hear the recipe isn’t working for you. There are so many variable between ingredients, climate and oven differences that sometimes you do need to adjust a recipe to make your own improvements. Burnt but raw dough could be a few things, but the two which immediately come to mind are that the dough hasn’t proved enough, or that your oven is running hotter than indicated. It’s hard to know without a detailed description of steps or some photos, though. If you’d like some more pointers, feel free to head over to my Facebook group, Combi Steam Cooking with Steam & Bake. There are lots of bread bakers in the group who may be able to offer feedback, and if I see a troubleshooting request I’ll usually pop in to see if I can help, too.
I have followed this recipe three times now with no changes or substitutions and it has consistently never worked. Always burnt on the outside and fully raw dough on the inside.
Sorry you had trouble! This recipe is actually on my list to make an accompanying video of – stay tuned for that! In the meantime, a quick youtube search for bread shaping should give you lots of visual guides. 🙂
im very confused with the whole “folding” process. are there pictures or a video to help me do this better?
the issue was that the center of the bread was under cooked, likely due to wrong folding.
otherwise, this was amazing.
You can certainly experiment with the humidity levels to get your preferred crumb and crust. Just be aware that using a very high humidity for the entire bake, while it will result in a thinner/softer crust, can also make the interior crumb a little damp. Some people enjoy this, though! Good luck!
Thank you for posting this.
The recipe calls for 30% humidity. What if I increase the humidity more and less? Will I get even softer crumb and CRUST if I were to use HIGHER humidity?
Thanks
Have made this bread several times and always have good results. The oats give a good texture to the loaf.
Gloria, I’m so glad this recipe worked well for you. It’ll definitely bake up as rolls. For a smallish roll you can divide the mixture into pieces weighing roughly 80 grams – not sure exactly how many that will give you from this recipe off the top of my head, but I’d guess around a dozen.
Hello Emily,
Thank you so much for this site. I have tried the recipe above and didn’t pre heat the oven so by the time it was up to temperature it was a bit over proved, however it was delicious. I have just had another go this afternoon and this time have split the dough into 2 small loaves as we don’t eat a huge amount of bread and I like to have it fresh. It is currently in the oven baking and looks and smells delicious. This is the first time I have successfully made bread from scratch. Previously I used a bread maker and while it was good, I didn’t like the shape of the loaf and the hole in the bottom where the paddle sits made it difficult to cut, the flavour of the above recipe is amazing and as you say much easier to digest. Could I make rolls with this recipe and how would I divide the dough?
Thank you so much, I shall now try more of your recipes.
Gloria.
Thanks for this great recipe. Being new to combi steam, I find this site so helpful. I did sub 200g of flour for wholemeal and in the first step I added about some mixed seeds (sesame, sunflower, pepitas, flaxseeds and chia seeds) and let them soak with the porridge. My lot don’t like seeded bread as usually the seeds are too hard but by soaking them, the end result has some texture but without the "hard" bits. I mix mine bread in a thermal cooker but just follow the instructions of their bread mix.
Hi Phyllis. Yes, using whole wheat flour will definitely alter both the taste and texture of this loaf. Most commercial whole wheat breads are made with only a relatively small percentage of whole wheat flour for this reason – maybe try a 50/50 split of whole wheat and white flour? That should give you a good balance. And you can certainly add more honey if you like, it won’t hurt anything. We use a small quantity because this is the loaf I give my kids for sandwiches and they just don’t need the extra sweetness!
I made the bread with whole wheat flour. I let one load proof in steam oven and one in the recipe overnight. Both were extremely dense but the overnight in the refrigerator was a bit less dense. If I ever make it again if add more honey for more sweetness or sugar to activate the yeast better. Probably a C+ in book but that’s probably because we’re use to sweet bread. This taste REALLY healthy.