These sticky sweet chocolate buns with glossy chocolate glaze were never meant to make it to the website.
The buns are a riff on my favorite overnight cinnamon rolls and lemon rolls, and I only baked them because one of my kids asked for a ‘swirly bun with chocolate inside’. But then they were so good that I had to share them!
Obviously I also had to test the recipe again. Twice. Just in case they needed to be adjusted. Ha.
And so, here we are, with yet another gorgeous brioche-style rolled dough recipe. This iteration is like a chocolate brioche, chocolate babka and chocolate cinnamon rolls all in one (except, um, without the cinnamon. Although you could definitely add some to your filling. It would be great).
As an Amazon affiliate I earn from qualifying purchases. This post may also contain other affiliate links, which means I may earn a commission if you click through and make a purchase, at no additional cost to you.
Top tips for brioche dough chocolate buns
If you’ve made any of my other rolled-dough-with-filling recipes, you’ll be familiar with brioche doughs.
For those who are new to brioche or enriched dough, it’s like regular bread dough except it’s enriched with butter, eggs and more sugar than normal bread. And in this case, rolled up with a hefty amount of chocolate filling for good measure.
When you’re working with enriched doughs, here are a few handy hints to keep in mind:
- Use a stand mixer. I have a KitchenAid but any decent stand mixer will do the job. You can mix and knead your dough by hand, but it needs a LOT of mixing for the gluten to develop. A mixer will save you.
- Make sure your kitchen isn’t too hot. I know this is hard in warm climates (I live in one of those climates!). Air conditioning, a cool day or a couple of turns in the fridge (if you just can’t keep the room cool) will be your friend. The dough is much easier to handle in a cool-ish kitchen.
- Don’t worry if your dough is soft and sticky. Enriched doughs are notoriously soft and they can be annoying to work with. I actually find them lovely; the key is to mix and knead them enough so they’re smooth, glossy and elastic, and to proof properly so the dough doubles in size during the first rise. If you do this, the dough handles beautifully and rolls out like a dream.
- Make use of your fridge. After you’ve filled and rolled up your dough, it’s going to be soft and bendy and hard to handle. You can cut the individual buns straightaway, but it’s easier to put the entire log of dough into the fridge for half an hour. This gives cleaner cuts and prettier spirals.
Are you enjoying this recipe? Try my popular Overnight Cinnamon Rolls and my zesty Lemon Rolls recipes too!
What ingredients do you need for chocolate buns?
These sweet chocolate rolls don’t need a huge number of ingredients, but you should bake them with the best butter and the best chocolate you can afford. You’ll taste the difference in the end product.
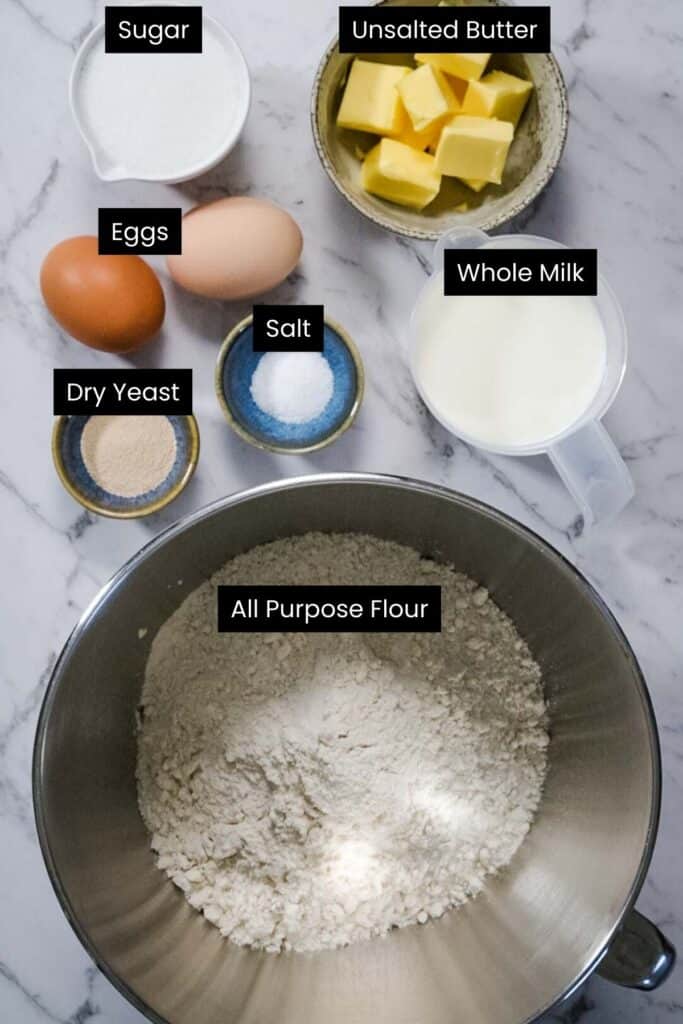
For the rolls themselves, you need
- Flour. I like all-purpose or plain flour for chocolate buns. It’s got a little less protein than bread flour, which makes softer, fluffier dough.
- Granulated sugar. If you prefer, you can use superfine or caster sugar, but granulated will dissolve into the dough just fine.
- Yeast. I use instant yeast in my chocolate rolls, but active dry yeast works too. If you want to use active dry, give it a head start before mixing your chocolate bun dough. Just put it into a small bowl with a teaspoon of the sugar and a quarter cup of the milk. Give it a stir and wait 5-10 minutes for it to start bubbling and smelling ‘yeasty’, then proceed with the recipe, tipping the activated yeast in with the other ingredients.
- Butter. I use unsalted butter because I like to control the amount of salt in the dough. If you use salted butter, omit the salt in the recipe. The butter needs to be very soft for the dough; you should be able to easily squash it with the back of a spoon.
- Eggs. I always use large (59g) eggs in my baking, and always, always free range. The color of the yolks is richer and the bird welfare makes me feel less creepy about buying them!
- Milk. Whole milk, or full-fat, is your best bet for chocolate rolls. You can get away with low fat milk or even water, but your buns won’t be as fluffy and light, they’ll have a chewier, more regular-bread-like texture.
- Salt. Just a little fine or kosher salt to balance everything out and heighten the flavor of the chocolate you’ll use in the filling.
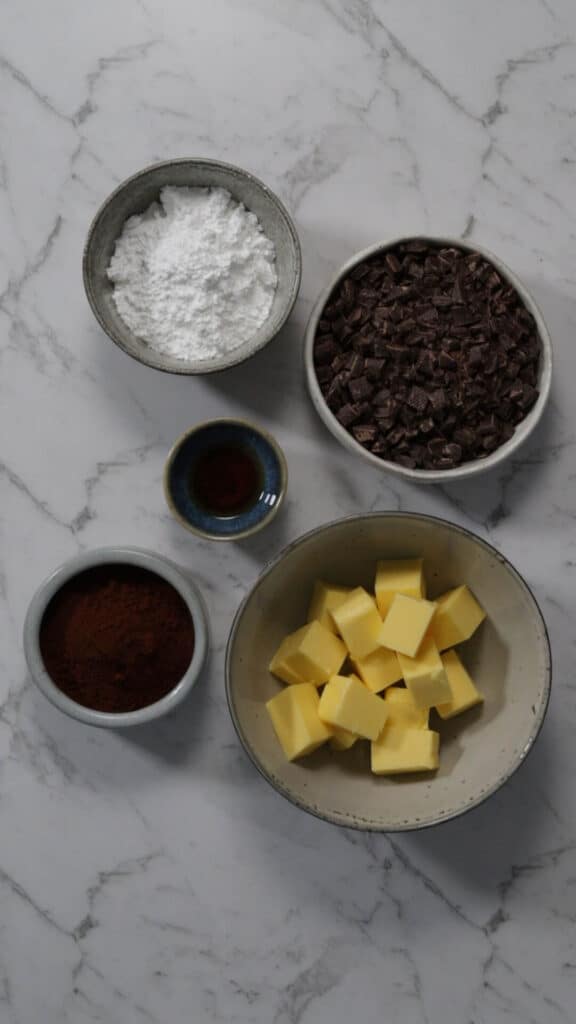
For the filling, here’s what you need
- Chocolate. Obviously. Use what you like, but know I made these with milk chocolate and decided they were too sweet, too over the top. I went back to dark or semisweet (about 55% cocoa solids) and much prefer it. If you love deep and rich chocolate flavor, bittersweet (70% plus) would actually be lovely.
- Butter. Yep, more butter. These aren’t meant to be low calorie chocolate buns! Again I use unsalted, it should be softened but doesn’t need to be as super soft as for the dough.
- Vanilla. I love the depth and aroma of vanilla in pretty much everything, and I make my own so I’ve always got it on hand (you can make some too! It’s super easy to make!). Extract is my go-to but if you have vanilla paste instead, use that.
- Powdered sugar/confectioners sugar/icing sugar. This filling is essentially a very thick, chocolate studded frosting. I designed it that way because I want it to melt into the buns as they cook, and I didn’t like the way granulated sugar left a slightly gritty finish.
- Cocoa. I keep Dutch-processed cocoa on hand for baking, and that’s what we’re using here. Dutch-processed cocoa is darker and less acidic than regular or natural cocoa, giving a mellow and rounded flavor to the filling.
And lastly, we’re adding a shiny chocolate glaze to these chocolate brioche delights, so you’ll need a few things for that:
- More powdered sugar. It dissolves and melts perfectly and fast, so it’s best for icings and frostings that need to be very smooth.
- More cocoa. Again I’m using Dutch-processed cocoa as I did for the chocolate bun filling.
- More butter. I know, I know. But just a tiny bit this time, and melted. You could omit the butter from the icing altogether, but it adds a lovely sheen and stops the icing from getting a crust as it cools down.
- More vanilla. Again, you could omit this. But I love it too much to leave it out.
Want to bake steam oven treats your family and friends will go crazy for? Get my book,
Steam Oven Baking: 25 sweet and stunning recipes made simple using your combi steam oven
Chocolate bun recipe step by step
As always, the full recipe for these chocolate buns is below in printable format. Read on for a visual step by step!
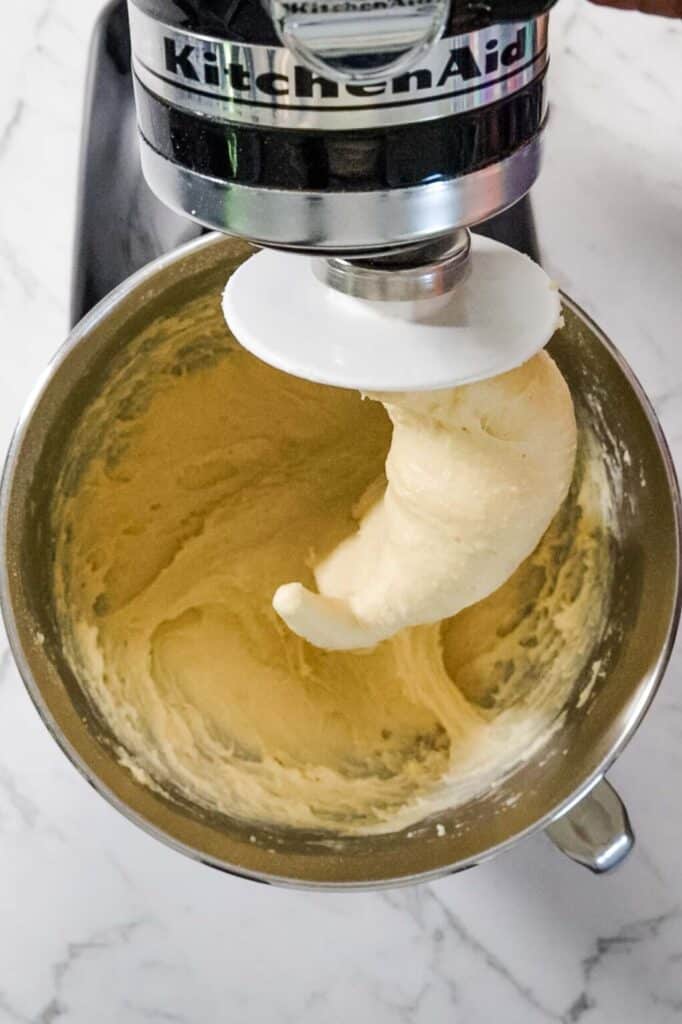
To make the dough, put all the ingredients into your stand mixer and mix on low speed until they’re combined. Turn up the mixer to a medium speed and let it go until the dough is glossy, elastic and smooth. In my KitchenAid this takes six or seven minutes.
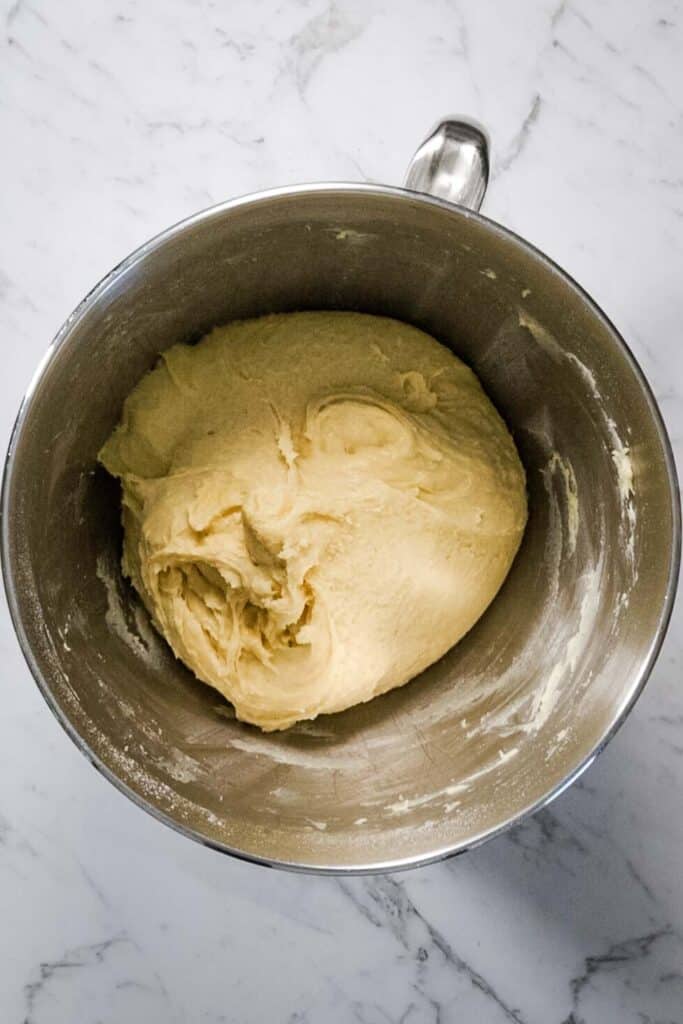
Time for the first proof! Put the bowl into your steam oven, or cover with a damp cloth and leave it in a warm spot, until it’s doubled in size.

Make the filling while the dough does its thing. Put your ingredients into a food processor and pulse until it’s mostly smooth with small chunks of chocolate. These will melt and give textural interest to the chocolate buns when they’re cooked.

Turn the proved dough onto a floured surface and gently press it down to knock out any large air bubbles. Then roll it out into a rectangle and spread the filling all over it. Be gentle enough that you don’t tear the dough with the bits of chocolate.
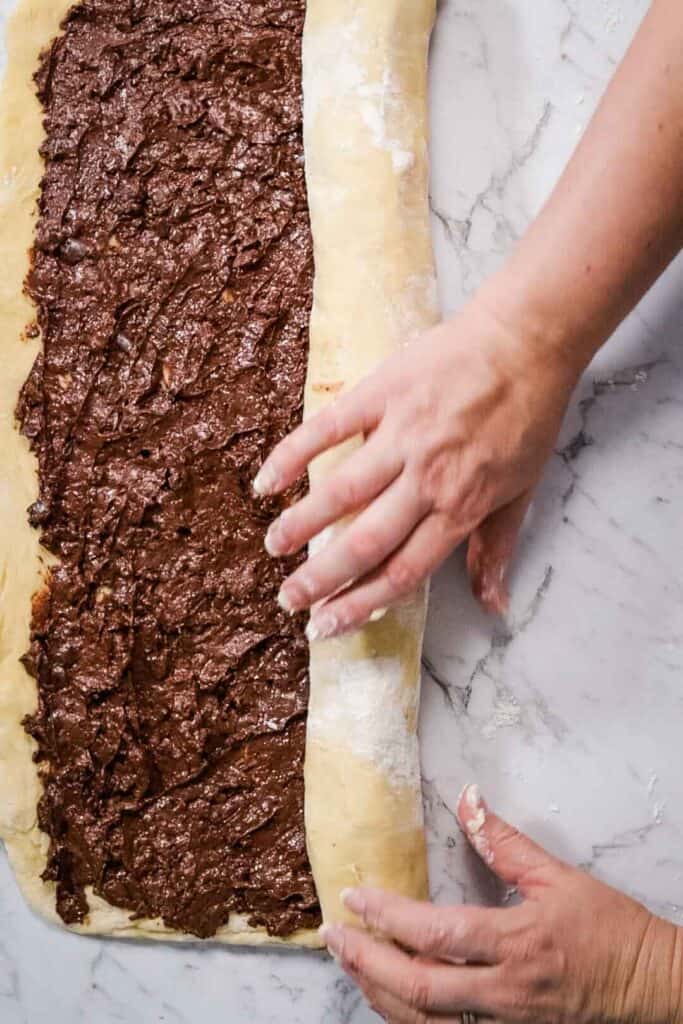
Roll up, roll up! Neatly and tightly roll up the chocolate dough, then pop the whole thing in the fridge to chill for half an hour or so. It’ll be easier to cut.

Slice the log into 12 even pieces, and admire the pretty little chocolate rolls you’ve just made for a minute. Arrange them into your baking dish.
Proof the chocolate buns (see the recipe card and notes below it; you’ve got the option of steam oven, countertop or fridge proving here).

Bake the chocolate rolls until they’re a deep golden brown. Everyone in your house will be climbing the walls because they smell so good at this point.

Make the glaze while the buns are baking. Mix up all the ingredients with a spoon until you’ve got a glossy, spoonable texture. The amount of water you’ll need is variable, add a teaspoon at a time until you’re happy with the consistency.
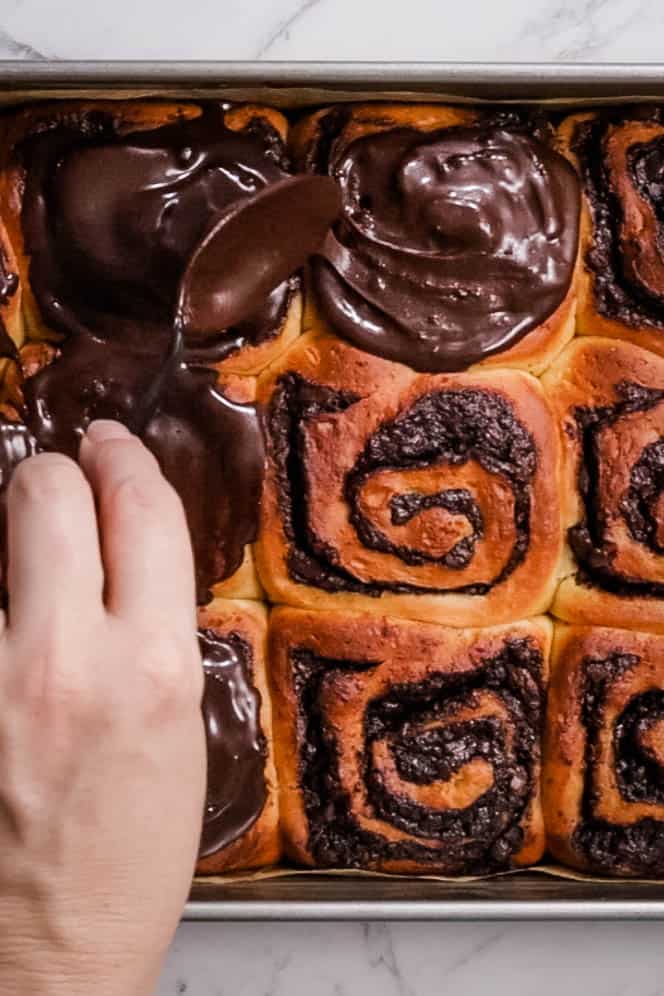
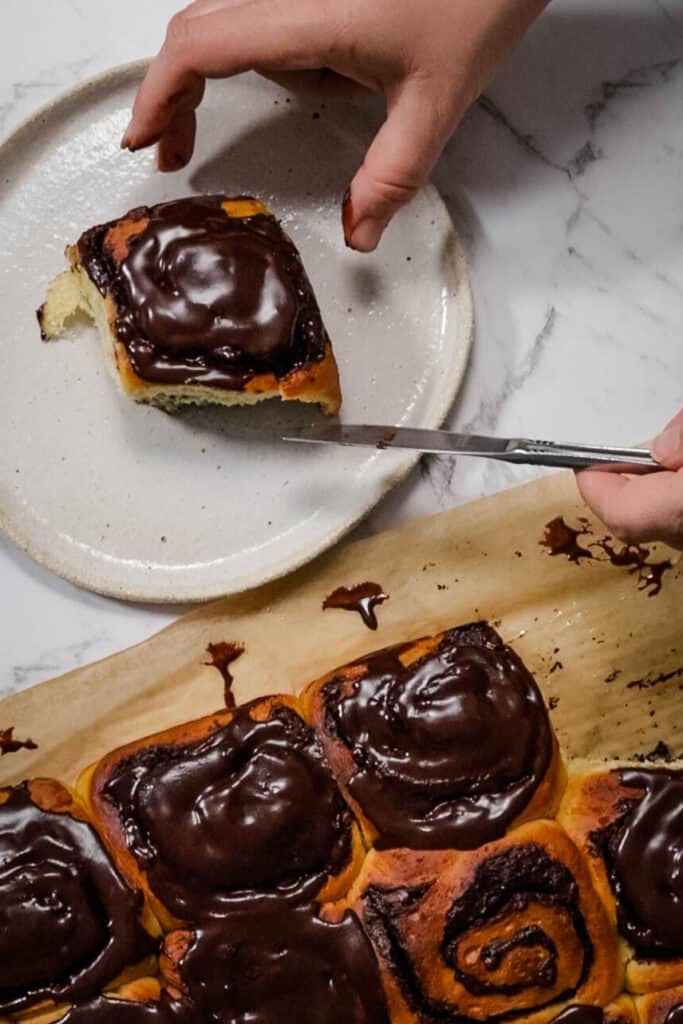
When the chocolate buns are baked, let them cool a little before spooning or drizzling glaze over the tops. You want it hot enough that the icing will melt slightly, but not so hot that it all absorbs into the buns.
If you can stand it, wait until these pretty, sweet and sticky chocolate rolls are warm rather than very hot. Then tear into them and enjoy your hard work!

Have you made and enjoyed this recipe? I’d love if you’d be kind enough to rate and review it via the stars in the recipe card, and leave a comment below! Ratings and reviews help other readers to find and understand my recipes from a reader’s perspective.

Chocolate Buns
Ingredients
For the buns
- 1 cup whole milk lukewarm
- 1/2 cup granulated sugar
- 4 cups all-purpose flour plain flour
- 2 eggs at room temperature
- 4 oz unsalted butter 1 stick, softened
- 2 tsp active dry yeast or instant yeast, see notes
- 1 tsp fine salt
For the filling
- 7 oz unsalted butter softened
- 8 3/4 ounces semisweet chocolate dark chocolate, chopped
- 1 tsp vanilla extract or vanilla paste
- 1/2 cup Dutch-process cocoa powder
- 1/2 cup powdered sugar icing sugar
For the icing
- 3 Tbsp unsalted butter melted
- 1 ½ cups powdered sugar icing sugar
- ⅓ cup Dutch-process cocoa powder
- 1 tsp vanilla extract or vanilla paste
- 2 tsp water lukewarm
Instructions
Make the dough
- Put all the dough ingredients into the bowl of a stand mixer fitted with the dough hook attachment. Mix on low speed to combine everything for 2 minutes, then increase the speed to medium and mix until smooth and glossy, about 6 minutes. The dough will be very soft, don’t worry if it doesn’t pull away from the sides of the bowl easily.1 cup whole milk, 1/2 cup granulated sugar, 4 cups all-purpose flour, 2 eggs, 4 oz unsalted butter, 2 tsp active dry yeast, 1 tsp fine salt
First proof
- Set your oven to dough proving setting (or steam-only setting, if you don’t have dough proving), 100ºF/38ºC. Put the uncovered bowl in the oven for 40 minutes, after which the dough should have doubled in size. If you don’t have a steam oven, cover the bowl with a damp cloth and set it in a warm place (somewhere that’s around 75°F/25°C is ideal) until doubled in size. Depending on the air temperature this should take an hour or two.
Make filling
- Put all the filling ingredients into the bowl of a food processor and pulse until the mixture is well combined and mostly smooth, with a few pea-sized chunks of chocolate.7 oz unsalted butter, 8 3/4 ounces semisweet chocolate, 1 tsp vanilla extract, 1/2 cup Dutch-process cocoa powder, 1/2 cup powdered sugar
- Assemble the rolls: when the dough has finished the first proof, scrape it out of the bowl onto a floured bench. Gently press to knock out any large air bubbles, then roll it into a rectangle about 40cm/16 inches wide and 30cm/12 inches long. Using an offset spatula or the back of a spoon, gently spread the filling over the dough, squashing it out so there’s a thin, even layer. Try not to let the little nubs of chocolate tear the dough.
- Roll the dough up tightly from the long side, so you have a 40cm/16 inch long spiral. Carefully cut into 12 even pieces with a serrated knife (it’s going to be soft, so you can either chill the entire roll for 30 minutes before cutting, or just gently reshape the buns after cutting). Lightly grease your baking pan and arrange the buns into it.
Proof the buns
- Set oven to dough proving setting (or steam only setting) again, 100ºF/38ºC. Put the uncovered dish in the oven for 30 minutes. The buns should look puffy and be starting to fill out the baking dish. If you don’t have a steam oven, cover with a damp cloth and leave in a warm place again to double in size. Or, if you prefer, see notes below for overnight proofing instructions.
Bake the buns – steam oven method
- If you did the fridge proofing method, remove the dish about an hour before you’d like to bake so the buns can come up to room temperature. If you’ve proved your buns in a steam oven, you can leave them in there while it heats up. Set oven to 350ºF/180ºC, combination steam setting (if you have variable steam settings, use 30%. If you can’t vary your steam, don’t worry. Just set to combination steam at the correct temperature and let the oven take care of the humidity). Bake the buns until deep golden brown and risen, about 25 minutes.
Bake the buns – regular oven method.
- If you did the fridge proofing method, remove the dish about an hour before you’d like to bake so the buns can come up to room temperature. Set oven to 375ºF/190ºC, fan forced/convection setting. Bake the buns until deep golden brown and risen, about 30-35 minutes. If they’re browning too quickly, cover the dish with aluminum foil part way through cooking.
- When the buns are done, remove from the oven and allow to cool for 10 minutes, then spread the chocolate icing over the top of each bun. Serve warm or at room temperature.
Icing
- Mix this up while the buns are baking. Put all the ingredients into a medium bowl and mix well to form an icing that’s smooth and able to be drizzled off the back of a spoon. If it seems too thick, add an extra teaspoon or two of water.3 Tbsp unsalted butter, 1 ½ cups powdered sugar , ⅓ cup Dutch-process cocoa powder, 1 tsp vanilla extract, 2 tsp water
Notes
- Makes 12 generous buns. You can cut the dough to make 16 smaller ones if you prefer.
- You’ll need a wide, shallow dish for baking these. I used a 23x30cm (9×12 inch) baking tray; a round 30cm/12 inch low cast iron pan or ceramic dish will work too.
- A note on yeast: I’ve used instant dried yeast in this recipe. If you’re using active dried, you’ll want to activate the yeast first. Pop the milk, sugar and yeast into a bowl and give it a stir, then wait 5-10 minutes until the yeast begins to bubble. Tip the mixture into your mixer bowl and proceed with the recipe as written.
- If you’d like to make these ahead of time, you can make the recipe up to the second proof. Instead of doing this proof in the oven, cover the pan and refrigerate overnight. The buns will slowly proof in the fridge. When you’re ready to bake, take them out and bring to room temperature for about an hour before proceeding with the baking step.
Nutrition
Do you want to use and love your steam oven more?
Steam Oven Insiders is a membership for steam oven cooks who’d like to know, use and love their combi steam ovens more.
In addition to an ad-free experience across the entire Steam & Bake website, Insiders also get exclusive access to a growing library of premium content, from recipes (always!) to downloadable cooking charts and guides, seasonal steam oven cooking ideas and more, delivered straight to your inbox in a helpful and inspiring twice-monthly newsletter.
As an Insider, you get the opportunity to shape the content published here, by requesting recipes and asking your curly steam oven cooking questions.
Not ready to become an Insider just yet? I hope you’ll still enjoy the hundreds of free recipes and articles across the Steam & Bake site, and that you’ll consider joining us in future.