


This post includes affiliate links. Find out more about affiliate links and how they help this site.
This twisted cinnamon bread is the happy outcome of several experiments that could vaguely be summed up as Easter bread.
Although I love the tradition of a hot cross bun on Good Friday, for Easter Sunday breakfast I was looking for something different. I often serve a chocolate cake of some sort later in the day, and with young kids around there are always chocolate eggs in the morning anyway, so I want to steer clear of chocolate but still have something indulgent on offer.

I played around with a few European style braided Easter bread recipes but something kept pulling me towards babka (not least because I follow Cloudy Kitchen on Instagram and her babka photos are nothing short of drool worthy). After several different filling tests, I had a bit of an epiphany and decided rather than reinvent the wheel, maybe I could just tweak my overnight cinnamon rolls recipe into a giant cinnamon roll babka loaf thingy. Turns out it’s not just doable, it’s fabulous. I hope you have a chance to try it out too, because you will not be sorry.
How to make twisted cinnamon bread
Essentially, we’re just going to follow the cinnamon rolls process for this recipe, except that instead of cutting the filled and rolled dough into smaller rolls, you’ll slice the entire log lengthways and twist the two halves together to form a gorgeous swirled loaf.
Forming this loaf looks complex but I promise you it’s not. And even if you muck it up and your twist isn’t even, the great thing is once it’s baked no one will notice at all. Every time I tested this bread the swirls inside looked a little different, and not one person I gave it to had a bad word to say (really, why would you?! Giant cinnamon roll bread is worthy of praise in whatever form it comes).
The key here to a nice, evenly rolled log and a clean cut through the middle is refrigerating the dough. This dough is very soft at room temperature, which makes it bake up lovely and tender, but cutting through it neatly and twisting the halves is MUCH easier if the dough’s been chilled for half an hour or so. Don’t say I didn’t warn you.

Honey syrup for twisted cinnamon bread
The honey syrup in today’s recipe is where we take a departure from cinnamon rolls.
Although you could absolutely stick with the cinnamon rolls theme and make a cream cheese glaze for your bread, I love the gentle sweetness and aroma of honey here. It doesn’t overwhelm the loaf, but it does add a little sweetness as the bread itself isn’t overly sugary.

Honey syrup also means you can slip a piece of this bread into the toaster quite happily – no thick frosting-style glaze to worry about burning or sticking to the insides of your toaster.
If you’d really prefer something more restrained and don’t want to add any extra sweetness to your cinnamon bread, feel free to leave the syrup off. I did so in my first test loaf and it was still fantastic, but everyone in my house (and my sister’s, where I took another test loaf last weekend) agreed that the honeyed version was better.
Happy cooking, and happy Easter if that’s your thing. See you here again soon.
Do you want to use and love your steam oven more?
Steam Oven Insiders is a membership for steam oven cooks who’d like to know, use and love their combi steam ovens more.
In addition to an ad-free experience across the entire Steam & Bake website, Insiders also get exclusive access to a growing library of premium content, from recipes (always!) to downloadable cooking charts and guides, seasonal steam oven cooking ideas and more, delivered straight to your inbox in a helpful and inspiring twice-monthly newsletter.
As an Insider, you get the opportunity to shape the content published here, by requesting recipes and asking your curly steam oven cooking questions.
Not ready to become an Insider just yet? I hope you’ll still enjoy the hundreds of free recipes and articles across the Steam & Bake site, and that you’ll consider joining us in future.

Over to you – if you try this recipe I’d love to know about it! Share your comments below or on Facebook, tag @steamandbake on Instagram, or pin all your favourite Steam and Bake recipes over on Pinterest!
Would you like more recipes and tips to help you cook with confidence? Join the mailing list to be alerted to new posts.
If you’re a steam oven owner, you may be interested in joining my Patreon community for extra support, recipes and bonus content.
Find inspiration with these irresistible baking recipes!

Cinnamon Babka with Honey Syrup
Ingredients
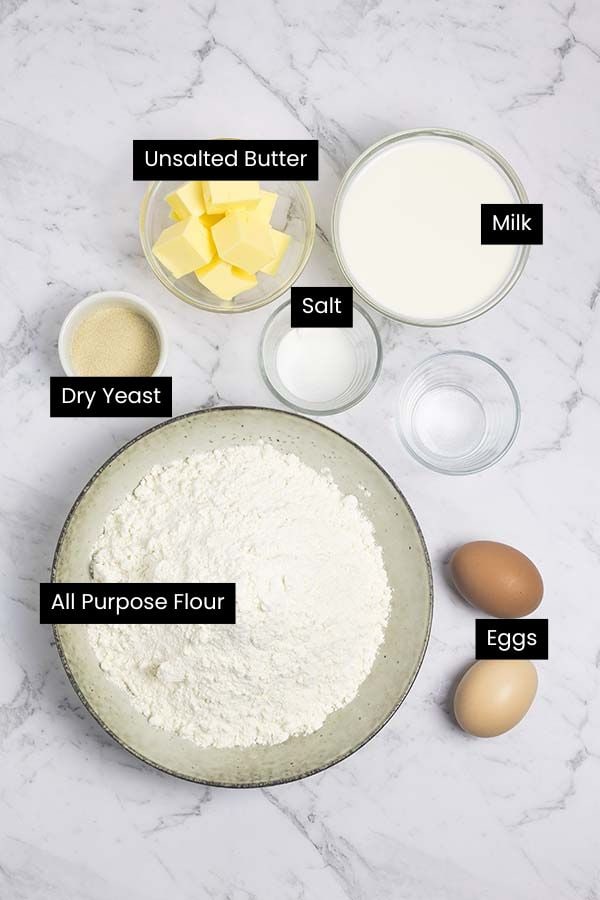
For the dough:
- 1 cup milk whole/full fat, slightly warmed
- 2 tbs superfine sugar caster sugar
- 2 tsp active dry yeast or instant yeast, see notes
- 2 eggs large, room temperature
- 1 stick unsalted butter very soft
- 4 cups all purpose flour plain flour
- 1 tsp salt
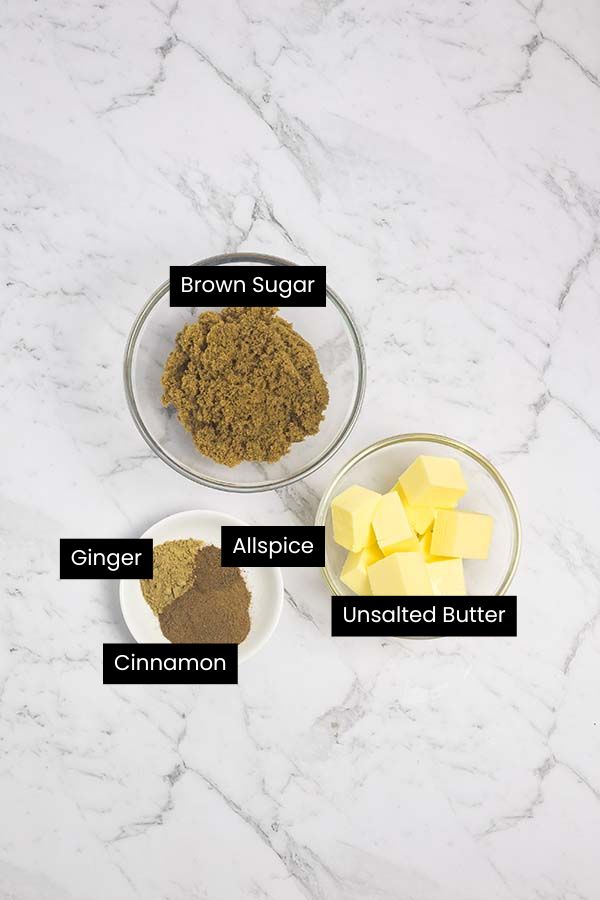
For the filling:
- 1/2 cup brown sugar lightly packed
- 1 tbs ground cinnamon
- 2 tsp ground ginger
- 1 tsp allspice
- 1/2 cup unsalted butter very soft
For the honey syrup:
- 1/2 cup granulated sugar
- 2 tbs clear honey
- 1/2 cup water
Instructions
Conventional Oven Method
- Make the dough: mix the milk and sugar together in a small bowl, then sprinkle the yeast over the top and leave to sit for 5 minutes.1 cup milk, 2 tbs superfine sugar, 2 tsp active dry yeast
- Put the eggs, butter, flour and salt in the bowl of a stand mixer fitted with the dough hook attachment. Give the yeast mixture a stir and tip into the bowl. Mix on low speed to combine everything for 2 minutes, then increase the speed to medium and mix until smooth and glossy, about 6 minutes. The dough will be very soft, don’t worry if it doesn’t pull away from the sides of the bowl easily.2 eggs, 1 stick unsalted butter, 4 cups all purpose flour, 1 tsp salt
- Do the first prove: cover the bowl with a damp cloth and set it in a warm place (somewhere that’s around 25°C/75°F is ideal) until doubled in size. Depending on the temperature this should take an hour or two.
- While the dough proves, make the filling by mixing everything together in a bowl. Set aside.1/2 cup brown sugar, 1 tbs ground cinnamon, 2 tsp ground ginger, 1 tsp allspice, 1/2 cup unsalted butter
- Assemble the bread: when the dough has finished the first prove, scrape it out of the bowl onto a floured bench. Gently press to knock out any large air bubbles, then roll it into a rectangle about 40cm/16 inches wide and 30cm/12 inches long. Using your fingers or a thin flat spatula, very gently spread the filling over the dough, squashing it out so there’s a thin, even layer.
- Roll the dough up tightly from the long side, so you have a 40cm/16 inch long spiral. Put the roll onto a baking tray and into the fridge to chill for 30 minutes. Skip this step at your peril – the dough is very soft and the resting/chilling time makes it far easier to cut.
- Once the dough is cool, remove from the fridge and cut it in half lengthwise with a sharp knife (I use my serrated bread knife for this). With the cut sides facing up, carefully overlap the halves, one over the other, to form a fat twist. Try to make sure the cut sides are always facing up as you go. Check the photos to see how I’ve done it.
- Lift the twisted loaf carefully and put it into your loaf pan, tucking the ends in to make it neat and even.
- Prove the bread: if you want to hold off baking this for up to 12 hours, cover with a plastic bag or cling wrap and pop the pan in the fridge. Otherwise, cover with a damp cloth and leave in a warm place again to double in size.
- While the bread proves, make the glaze. Put all ingredients into a pan over medium heat and bring to the boil. Simmer for 3-4 minutes, skimming any scum which rises to the top of the pan. Remove from heat and allow to cool while the bread cooks.1/2 cup granulated sugar, 2 tbs clear honey, 1/2 cup water
- Bake the bread: If you did the fridge proving method, remove the pan about an hour before you’d like to bake so the bread can come up to room temperature. Set oven to 190ºC/375ºF, fan forced/convection setting. Bake the loaf until deep golden brown and risen, about 25-30 minutes. Remove from oven and pour or brush the room temperature glaze over the hot bread. Let cool completely before slicing and serving.
Combi Steam Method
- Make the dough: mix the milk and sugar together in a small bowl, then sprinkle the yeast over the top and leave to sit for 5 minutes.
- Put the eggs, butter, flour and salt in the bowl of a stand mixer fitted with the dough hook attachment. Give the yeast mixture a stir and tip into the bowl. Mix on low speed to combine everything for 2 minutes, then increase the speed to medium and mix until smooth and glossy, about 6 minutes. The dough will be very soft, so don’t worry if it doesn’t pull away from the sides of the bowl easily.
- Do the first prove: set your oven to dough proving setting (or steam-only setting, if you don’t have dough proving), 38ºC/100ºF. Put the uncovered bowl in the oven for 40 minutes, after which the dough should have doubled in size.
- While the dough proves, make the filling by mixing everything together in a bowl. Set aside.
- Assemble the bread: when the dough has finished the first prove, scrape it out of the bowl onto a floured bench. Gently press to knock out any large air bubbles, then roll it into a rectangle about 40cm/16 inches wide and 30cm/12 inches long. Using your fingers, very gently spread the filling over the dough, squashing it out so there’s a thin, even layer.
- Roll the dough up tightly from the long side, so you have a 40cm/16 inch long spiral. Put the roll onto a baking tray and into the fridge to chill for 30 minutes. Skip this step at your peril – the dough is very soft and the resting/chilling time makes it far easier to cut.
- Once the dough is cool, remove from the fridge and cut it in half lengthwise with a sharp knife (I use my serrated bread knife for this). With the cut sides facing up, carefully overlap the halves, one over the other, to form a fat twist. Try to make sure the cut sides are always facing up as you go. Check the photos to see how I’ve done it.
- Lift the twisted loaf carefully and put it into your loaf pan, tucking the ends in to make it neat and even.
- Prove the bread: if you want to hold off baking this for up to 12 hours, cover with a plastic bag or cling wrap and pop the pan in the fridge. Otherwise, put it back into your steam oven on the dough proving setting (or steam-only setting, if you don’t have dough proving), 38ºC/100ºF, until it’s puffy and doubled in size.
- While the bread proves, make the glaze. Put all ingredients into a pan over medium heat and bring to the boil. Simmer for 3-4 minutes, skimming any scum which rises to the top of the pan. Remove from heat and allow to cool while the bread cooks.
- Bake the bread: if you’ve proved your bread in the oven, you can leave them it there while it heats up. If you did the fridge proving method, remove the pan about an hour before you’d like to bake so it can come up to room temperature. Set oven to 180ºC/350ºF, combination steam setting (if you have variable steam settings, use 30% – if you can’t vary your steam, just set to combination steam and let the oven take care of the humidity). Bake the bread until deep golden brown and risen, about 25 minutes. Remove from oven and pour or brush the room temperature glaze over the hot bread. Let cool completely before slicing and serving.
Notes
- This recipe makes 1 x 9in x 4in (23cm x 10cm) loaf, enough for about 10 thick slices.
- You’ll need a large loaf pan for this bread. I use a heavy siliconized 1kg/2lb pan. If you have much smaller pans you’ll have to cut your loaf into two, or you could turn your twisted loaf into a circle and bake it in a round pan. As with my cinnamon rolls, you can prepare this the day before and refrigerate overnight, ready to bake the next day. Be careful doing this if you want to serve it for breakfast, though: the loaf really needs to cool completely before it can be turned out and sliced easily, so I tend to bake the afternoon or evening before and have it ready to go for the next morning.
- A note on yeast: I use active dried yeast. If you’re using instant, you can skip the first step and just mix the yeast, milk and sugar straight in with the dough. Instant yeast might take a little longer to complete the first prove, so allow for this in your rising time.
- This loaf will keep for a couple of days, well wrapped, at room temperature. If you want to store it for longer I recommend freezing individual slices.


2 Responses
Ok, first off this bread is delicious! But….. I’m having difficulty with timing as I’ve had to bake twice as long and still not quite there. My proofing was also very long used instant yeast and my steam oven proof is 86 degrees. Bread over loaf pan edges, did not deflate when poked for doneness, yet not fully cooked even though baked twice as long. Had same problem with the Parmesan garlic bread(also delicious). Also having trouble with rolling tightly after first proof…log is too long and too wide, with fillings leaking out. Total time > 4 hrs!
Tried this recipe out to make some little knotted babka buns over the weekend, and they turned out great! Super pleased and this recipe makes some very yummy bread!