


This post includes affiliate links. As an Amazon affiliate I earn from qualifying purchases – find out more here.
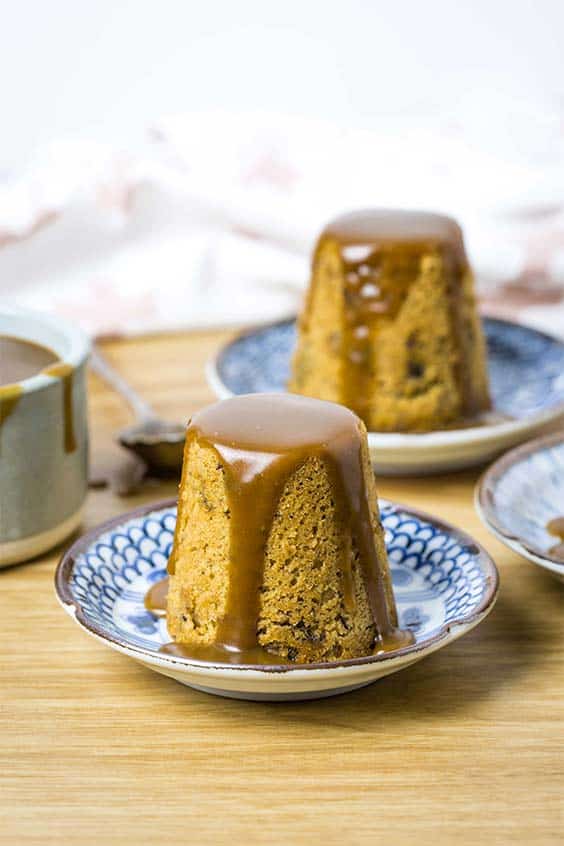
Sticky date puddings with toffee sauce are a favorite British/Australian dessert, and it’s not hard to see why. Delicate sponge pudding is given a caramel color and sweetness thanks to dates, and the whole thing is drenched in buttery, sticky and glorious toffee sauce.
Sticky date pudding is probably not the most on-trend dessert you’ll find, but with excellent and not-so-excellent variations found in cafes, bistros and pubs all over Australia and the UK, it’s definitely an enduring classic. And even a mediocre version is an appealing dessert menu choice so long as the kitchen doesn’t skimp on the sauce.
Happily for all of us here, sticky date pudding makes for a brilliant steam oven dessert. If it’s not on a menu anywhere near you (or even if it is), get ready to make an exemplary version of it right in your own kitchen!
These puddings, sometimes referred to as sticky toffee pudding because of the sauce, are quick to mix up and ideal to prepare ahead, as you can freeze the cooked puddings and reheat straight from frozen.
Cooking with dates
I know not everyone is a fan of dates. They aren’t the most appealing looking things, especially when you soak them as we’re going to do here! To be honest, I don’t love dates on their own, but they are critical to this recipe.

You won’t really taste the dates in the finished puddings, though if you’re really concerned about having visible pieces in the batter, you can puree the date mixture before mixing it in. I just give it a mash with the back of a spoon, so there are a few chunkier pieces and a lot of syrupy date puree, but blending it until the fruit is completely smooth will work for a more even texture.
Individual sticky toffee puddings or a large one?
I love these puddings steamed and served as individual desserts, but you can definitely make one large pudding in a baking dish or pudding basin.
The timings in the recipe below are for 6 or 8 individual puddings, but if you’d like to make a larger version you can steam it in a square 8”/20cm baking dish for about 40 minutes and cut into smaller squares. Or make a classic steamed pudding in a large (1qt/1litre) basin, which will need to be cooked for around an hour.
More favorite steamed desserts:
Should you cover puddings for steaming?
I used to always cover steamed puddings but I’ve found, especially for individual sized ones which don’t take that long to cook, it’s not actually necessary. Hooray for saving time and effort! This goes for both steam oven and saucepan-steamed pudding.
I still cover large steamed Christmas puddings because they take hours and I don’t want to ruin them with condensation drips, but for most others it doesn’t matter.
In the case of these sticky date puddings, I don’t cover the small or large versions. Just be aware that if your steam oven has a vent in the top, as some do, moisture can pool around that vent and drip onto your food. I have this issue with my oven but get around it my making sure the puddings aren’t sitting directly under that vent when they go in to cook.
Mixing and cooking a sticky date pudding
This batter comes together easily in a stand mixer, although you could do it by hand with a whisk. The butter and sugar need to be creamed together, but it’s not necessary to whip them until the butter is super fluffy, as it is for some cakes. The eggs get whisked in until everything is relatively smooth and then you just have to fold through the date mixture and dry ingredients.

Make sure you divide the mixture into cooking vessels and get it into the oven fairly quickly once it’s mixed – the raising agents in the batter start activating once it’s all mixed together so this isn’t a batter you should keep in the fridge to cook later. If you want to make the puddings ahead of time that’s fine, but definitely cook them and then reheat rather than storing uncooked (reheating instructions are in the recipe).
You’ll need to grease your cooking vessel/s well. I use heatproof plastic pudding molds to cook these, but ceramic or metal dishes are fine too.
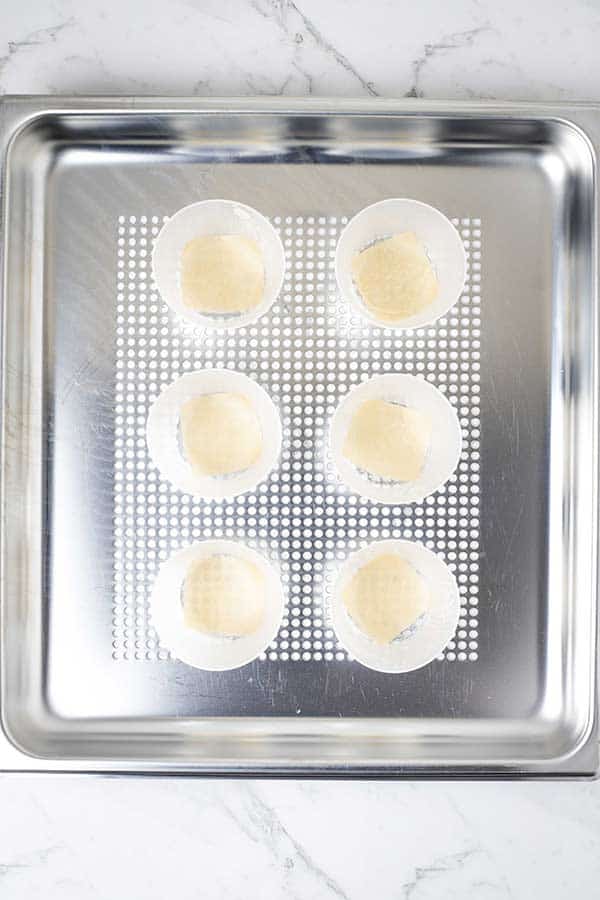
Whatever you use to cook your puddings, I highly recommend that if you’re making them to be turned out for serving (rather than cutting squares from a large dish), put a little parchment paper into the bottom of the molds. It doesn’t even have to be the same shape as the mold. I am too lazy to cut tiny circles for mine but little squares of paper work just fine and ensure the entire pudding slides out after cooking (once a butter knife is run around the edges of each mold).
Sauce for sticky date pudding
This toffee sauce is a one step mix and cook version, so you don’t need to worry about cooking sugar for caramel and getting it to the perfect color without burning it. Instead, brown sugar gives us the caramel color while butter and cream add the silky richness.

I always add a touch of salt to my caramel sauce. It enhances the flavor and brings out more complexity in the sauce.
If you’d like to really go all-in on the sauce here, make a double batch and as soon as the puddings come out of the oven, poke a few holes in each one with a skewer. Pour some of the hot sauce over the hot puddings and let it soak in, saving the remaining sauce for serving. Drowning them in sauce like this will turn your puddings a darker colour and make them all-over moist and sticky, but beware it’ll also up the sweet factor.
The photographed puddings don’t have the extra soaked-in caramel sauce as I quite like the counterpoint between the lighter texture of the pudding and the sweetness of the sauce, but you do whatever sounds most appealing!
Happy cooking, see you here again soon.
Do you want to use and love your steam oven more?
Steam Oven Insiders is a membership for steam oven cooks who’d like to know, use and love their combi steam ovens more.
In addition to an ad-free experience across the entire Steam & Bake website, Insiders also get exclusive access to a growing library of premium content, from recipes (always!) to downloadable cooking charts and guides, seasonal steam oven cooking ideas and more, delivered straight to your inbox in a helpful and inspiring twice-monthly newsletter.
As an Insider, you get the opportunity to shape the content published here, by requesting recipes and asking your curly steam oven cooking questions.
Not ready to become an Insider just yet? I hope you’ll still enjoy the hundreds of free recipes and articles across the Steam & Bake site, and that you’ll consider joining us in future.

Steamed Sticky Date Pudding
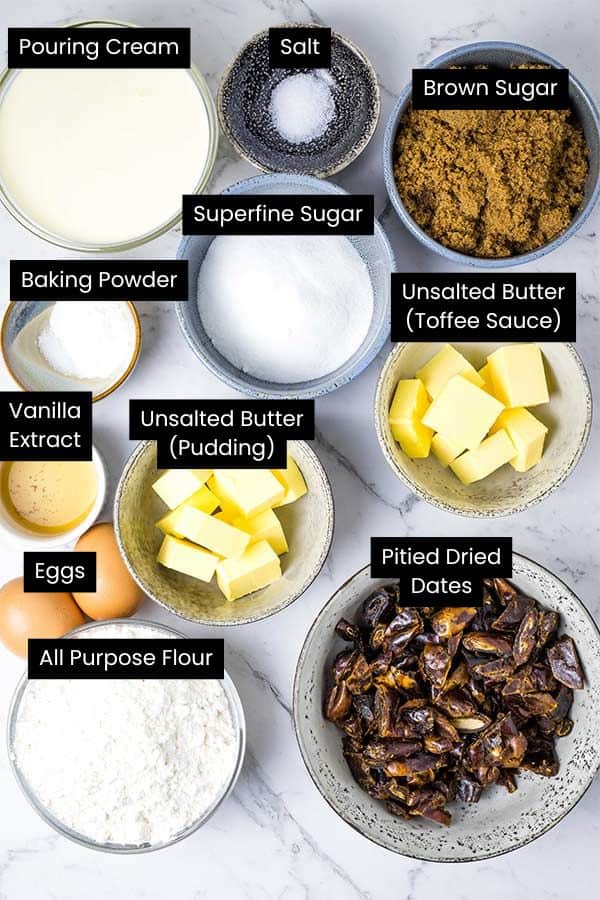
Ingredients
For the puddings
- 1.5 cups pitted dried dates 250g 9oz roughly chopped
- 1 tsp baking soda bicarbonate soda
- 1 cup water boiling
- 3 oz unsalted butter 85g softened
- ½ cup superfine sugar 100g caster sugar
- 1 tsp vanilla extract or vanilla paste
- 2 eggs
- 1 ½ cups all purpose flour 200g plain flour
- 2 tsp baking powder
- ¼ tsp salt
For the toffee sauce
- 1 cup dark brown sugar 200g firmly packed
- 1 cup pouring cream
- 3 oz unsalted butter 85g
- ½ tsp salt fine or table salt
Instructions
- Put the dates, baking soda and boiling water into a bowl and leave to stand for 10 minutes.1.5 cups pitted dried dates, 1 tsp baking soda, 1 cup water
- Preheat oven to 212°F/100°C, steam setting (100% humidity). Grease 6 x 2/3 cup pudding molds (or 8 x ½ cup molds for smaller puds, or use ramekins, or a muffin pan) and line the base of each with a small piece of parchment paper. Set aside while you make the puddings.
- Put the butter and sugar into the bowl of a stand mixer and beat until creamy. Mix in the vanilla then the eggs, one at a time, fully incorporating the first before adding the second.3 oz unsalted butter, ½ cup superfine sugar, 1 tsp vanilla extract, 2 eggs
- Give the date mixture a and squash any larger pieces with the back of a spoon to break them down a little (or puree in a blender if you want it completely smooth), then add this to the mixture with the flour, baking powder and salt. Mix just until everything is combined and smooth.1 ½ cups all purpose flour, 2 tsp baking powder, ¼ tsp salt
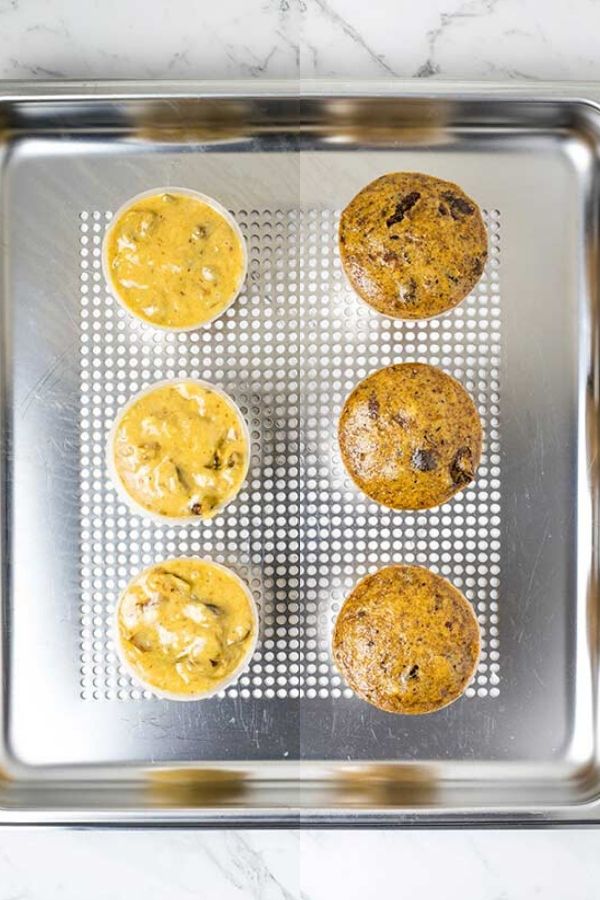
- Divide the mixture evenly between the prepared molds. Steam for 20 minutes (no need to cover).
- While the puddings are steaming, make the sauce. Put all the ingredients except the salt into a saucepan and cook over medium heat until the butter melts and the mixture comes to a boil. Reduce heat to a simmer and cook, stirring occasionally until the sauce is thick and glossy. This should take about 5 minutes. Stir in the salt (start with the lesser amount and add more to taste if you think it needs it).1 cup dark brown sugar, 1 cup pouring cream, 3 oz unsalted butter, ½ tsp salt
- When the puddings are cooked, turn them onto serving plates and pour over a generous amount of sauce. Add a spoonful of cream to the plate if you like, and serve immediately.
- The puddings and sauce can be made ahead of time and fully cooked. The puddings will keep, individually wrapped in the freezer for up to 2 months, and the sauce will keep in the fridge for 4-5 days. Reheat the puddings from frozen by putting into a cold oven and setting to 212°F/100°C, steam setting (100% humidity). Heat for 12-15 minutes. Reheat the sauce on the stove until warm.
Notes
- These puddings can be made in individual pudding molds, teacups, ramekins or muffin pans. The recipe makes 6 2/3 cup sized puddings or 8 half cup puddings if you’d like to stretch the batter further. The cooking time remains the same. See the main post for larger pudding cooking times.
- You can use regular brown sugar in the sauce instead of dark brown, you just won’t get as deep a color.
- I like to serve these with a spoonful of thick cream, which might seem like overkill but it makes a nice counterpoint to the sweetness of the puddings and sauce.
Nutrition
Over to you – if you try this recipe I’d love to know about it! Share your comments below or on Facebook, tag @steamandbake on Instagram, or pin all your favourite Steam and Bake recipes over on Pinterest!
Would you like more recipes and tips to help you cook with confidence? Join the mailing list to be alerted to new posts.


4 Responses
If you’re reheating without a steam oven, the microwave is probably your best bet. I’d heat the pudding and sauce separately in the micro, then pour over the sauce to serve.
Hi,
Want to make these and take to elderly relative,can you tell me the best way to reheat without a steam oven?
Thanks
Yes, you can definitely freeze the sauce! Just pop it in the fridge the day before you want to serve, so it can thaw out.
Lovely recipe and easy to make. One question – can you freeze the sauce too?