

I want to preface this post by saying that sourdough bread, and steam oven sourdough like we’re talking about today, is a huge subject to cover! And although I bake sourdough regularly, I’m not a commercial baker, nor an expert in dough structure, proofing, forming and scoring.
There are loads of great resources for all those things on the big ol’ internet, but as usual, there’s not so much detail on using a steam oven to bake sourdough loaves. That’s where I can help.
This post focuses on my steam oven sourdough recipe and method. If you’d like more general details and tips on this topic, read my educational post on Baking Sourdough Bread in a Steam Oven. Think of this post and that one as companions.
I’ve shared my basic recipe and method for sourdough below, so you can give it a try even if you’ve never baked a loaf before. What we’re focusing here on is advice for baking your sourdough in a steam oven. There are countless ways to deal with starters, dough mixing and loaf formation, and you can use your own preferred methods for these if you like, just following my instructions for the baking part. Or, you can follow my entire recipe start to finish. Over many hundreds (thousands?) of loaves, I’ve developed my own standard baking processes for steam oven sourdough and I know this works.
Why does this work so well in a steam oven?
Steam in the oven is what gives sourdough that beautiful crust and generous oven spring. During the first 10–20 minutes of baking, steam keeps the surface of the dough moist and flexible, allowing it to expand fully before the crust sets and hardens. In a traditional Dutch‑oven setup, the enclosed pot traps the moisture that naturally evaporates from the dough, creating a mini‑steam chamber. In a combi steam oven, you can control both temperature and humidity, which offers a different kind of precision and consistency.
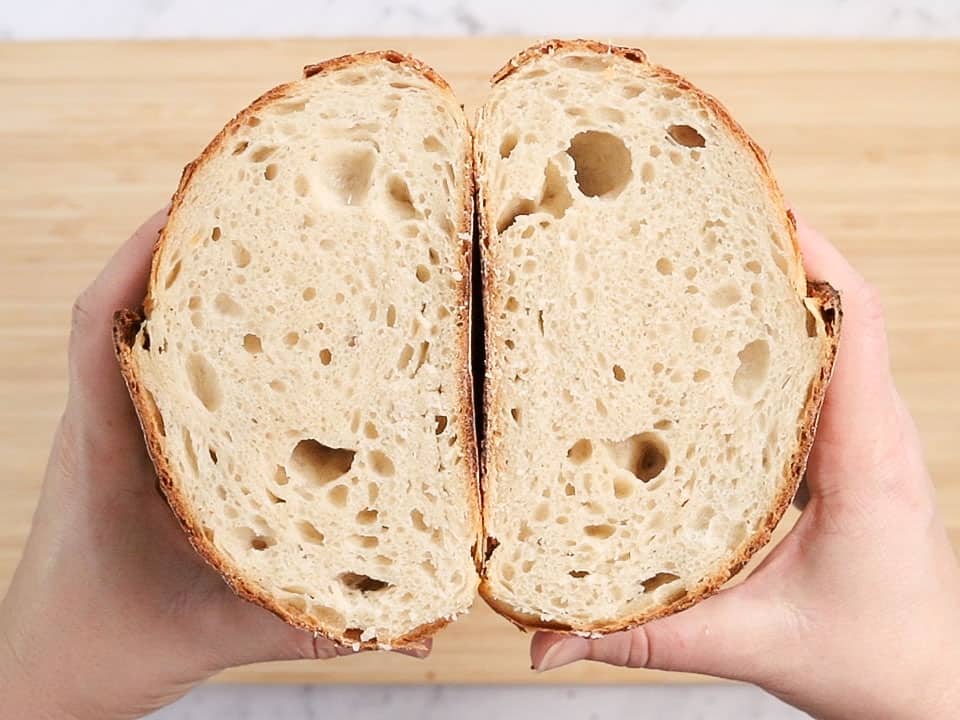
Because steam is so critical, this recipe leans on a short, intense burst of high humidity at the start of the bake, followed by a dry, even finish to develop color and structure. The result is a loaf that’s crisp on the outside, with a tender, open crumb inside—perfect for toast, sandwiches, or simply slathered with butter.
What’s happening in the process of steam oven sourdough?
The recipe starts with a straightforward mix of water, active sourdough starter, white bread flour, and salt. After a brief resting period, the dough is strengthened with a series of gentle stretch‑and‑fold manipulations. These folds build gluten which in turn creates excellent structure for your bread.
The first rise (bulk fermentation) happens at room temperature for 8–10 hours. This long, slow rise develops both flavor and gas, and it’s the stage where the dough doubles in size and becomes lightly domed and yeasty in aroma. The second rise is a cold fermentation in the fridge, which further deepens the sourdough character and helps the loaf retain its shape during baking.
When you’re ready to bake, the oven is preheated in Combi Steam mode at around 425°F (220°C) with 80–100% humidity. The dough goes in cold from the fridge, scores beautifully, and receives 20 minutes of high‑humidity steam to encourage maximum oven spring. Then the steam is turned off and the loaf is finished off at the same temperature until the crust is deep golden and the base sounds hollow when tapped.
Reader question: how does this compare to Ken Forkish’s Dutch‑oven method?
One of my readers, Linda, has asked:
“I’ve read your info on making sourdough using combi steam/heat and then just heat, which is what artisan bakers like Ken Forkish recommend. Specifically, you preheat a Dutch oven in a 475°F oven, put the dough into it, cover it with the lid, and bake at 475°F for 30 minutes with the lid on for steam. Then you remove the lid for another 20–30 minutes, still at 475°F. It comes out perfect. Your sourdough calls for a lower temperature, 430°F for 20 minutes uncovered and 100% steam, then no steam and 430°F for another 12 minutes. Comparing the Ken Forkish recipe and your sourdough, you use a lower temp, what could be more steam, and less baking time. What are your thoughts on adapting the Ken Forkish recipe to a combi steam oven?”
This is a great question!
In the Ken Forkish method, the Dutch oven is a high‑heat, high‑retention vessel: it’s preheated for a long time at 475°F, then the dough is dropped in cold and baked with the lid on for 30 minutes. The cast‑iron walls radiate a lot of heat very quickly, and the enclosed environment traps moisture from the dough itself, which acts as steam. The crust doesn’t set too early, so the loaf can spring dramatically. After 30 minutes, the lid is removed and the oven continues at to deeply brown and firm up the crust. This method is very forgiving and widely used precisely because it’s relatively simple and produces consistent, dramatic results.
In the steam‑oven method shown here, the environment is different. Combi steam ovens can deliver a controlled, high‑humidity atmosphere very quickly, which means the dough can get the benefits of steam in a shorter, more targeted window (about 20 minutes). Because the oven itself is usually at a slightly lower temperature (around 425–430°F), the outer crust develops a bit more gently, and the overall bake time is shorter. The result is often a loaf with slightly less extreme color and a more even crust, but still with excellent oven spring and an open crumb.
So, can you adapt the Ken Forkish Dutch‑oven method to a combi steam oven? Yes, with some tweaks:
- Temperature: Instead of 475°F, you can start at about 440–450°F in Combi Steam mode and then drop to 420–430°F in pure convection for the final browning. This keeps the heat high enough for good spring without pushing the crust into over‑browning too quickly.
- Steam time: You don’t need 30 minutes of steam; around 20 minutes is enough. The oven’s steam generation is more efficient than the moisture trapped in a Dutch oven, so the surface of the dough stays pliable without risk of over‑softening.
- Bake time: Expect a shorter total bake time. The controlled environment of a steam oven means the bread can reach its ideal internal temperature and color in less time than in a traditional oven, especially if you’re using a baking stone or steel.
You can absolutely use a Dutch oven inside a combi steam oven if you wish (see the recipe details below), especially if you don’t have a baking stone. It’s sort of combining the best of both worlds: the thermal mass of the pot plus the controlled humidity of the oven. Just make sure to leave the lid OFF the Dutch oven if you’re using it in your steam oven, because you aren’t needing to trap humidity; rather, the oven’s humidity will circulate around the uncovered bread in your pot.
Ultimately, the two methods are achieving the same goal—good oven spring, good crust, and a flavorful crumb—but they get there through different tools and settings. The Dutch‑oven method is more hands‑on and traditional, while the combi steam‑oven method is more precise and consistent, especially if you like to bake multiple loaves or experiment with different shapes and sizes.
Let’s bake some bread! I’m always happy to answer your questions so feel free to drop a comment below (and a star rating, if you’ve tried the recipe!).

Sourdough Bread
Ingredients
- 300 g water room temperature; filtered is ideal
- 100 g sourdough starter fed and active; see notes
- 500 g white bread flour see notes
- 10 g fine salt
Instructions
Mix dough
- Put the water into a large bowl and add the starter. Give it a quick stir just to start breaking up the starter; it doesn't matter if it's lumpy.
- Add the flour and salt to the bowl and put in your stand mixer with the dough hook attachment (or use a large spatula to mix by hand if you prefer). Mix on low speed until a very shaggy dough comes together. It doesn't need to be smooth at all, you just need to mix until all the dry flour is taken up by the water and there aren't streaks of it running through the mixture.
Stretch and folds
- Scrape down the sides of the bowl and cover with a plastic bag, then let it rest at room temperature (ideally 65-68°F/18-20°C) for about an hour. It won't look any different, and that's fine.
- Uncover the bowl and, using the fingers of one hand, work your way around the dough, scooping it up and pulling up and over onto itself. This is called stretch and fold. For this first go, it's going to be really sticky and messy. That's normal. Do about 20 stretch and folds, going around the bowl of dough, until it comes together in a ball. You'll know when the dough's had enough as it'll become very elastic and harder to stretch.
- Cover the bowl again and let it rest for 20-30 minutes, then repeat the stretch and fold (this time, it'll be less sticky and you'll probably only need to do around 10 stretches). Repeat this process 2-3 more times over the following hour or two; you should aim for a total of at least 4 'rounds' of stretching and folding over the course of a couple of hours.
First prove
- Time for the bulk prove. Cover the bowl and set it aside at room temperature for 8-10 hours (longer if it's colder, but less if your room is warmer than 65-68°F/18-20°C. Too warm and you risk overproving and ruining your dough). It will grow to about double the size and smell yeasty, and be slightly domed on top.
- When the bulk prove is done, take out your banneton/proving basket and dust it liberally with rice flour. Set aside while you shape the dough.
Forming
- Turn the proved dough onto your counter (dust with a little rice flour if you're worried about sticking). Shape the dough into either a round or an oval, depending on the banneton shape, by gently pulling and folding the dough onto itself. You don't have to be afraid of it, but don't go punching it into shape either. It should be bouncy and have a lovely structure, and the shaping is aiming to create tension and a smooth surface on one side of the dough.
- Lift the shaped dough and place it, smooth side down, into the banneton. Sprinkle extra rice flour over the surface and around the edges, moving the dough so it gets down the sides as well.
Second/final prove
- Cover the banneton with a plastic bag (or get all fancy and use a plastic shower cap if you prefer), and put it in the fridge for somewhere between 8 and 24 hours. The longer you leave it, the more sourness you'll get, so you can experiment with different times to see what you prefer.
Bake
- At last, time to bake! When you're ready to bake, preheat your oven to Combi Steam, 425°F/220°C, 80-100% humidity (high humidity). If you want to use a baking stone or steel, put it in the oven now for the preheat.
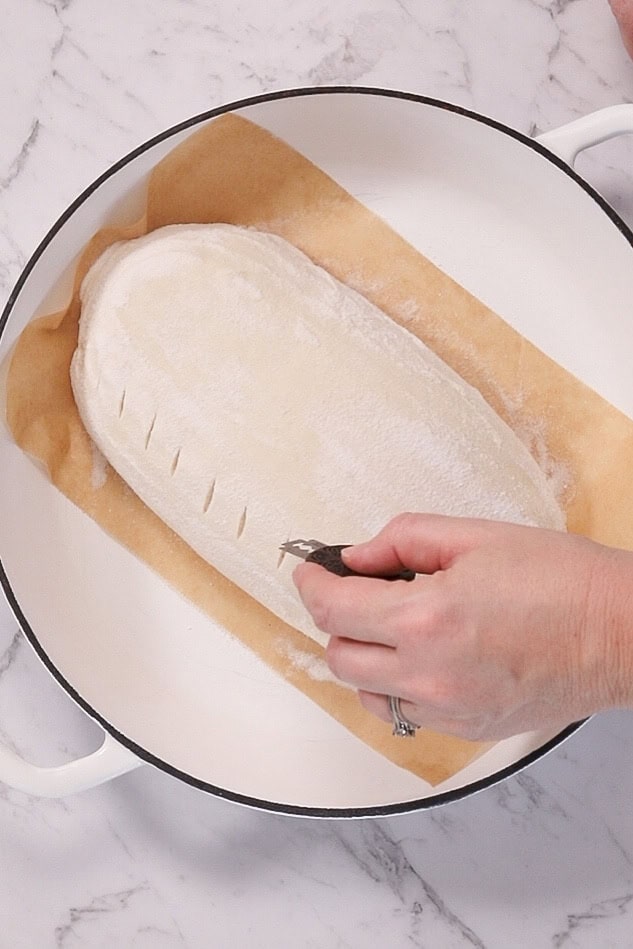
- When the oven is good and hot, put a piece of parchment paper onto a chopping board (if you're using a baking stone) or into the base of a Dutch oven. Take the dough out of the fridge and gently invert it onto the paper so you've got a lovely rounded shape with the rice flour circles on top. Score the top of the bread with a sharp razor or bread lame, and get it straight into the hot oven. For the baking stone, slide the loaf and parchment off the board onto the stone; for Dutch oven just put the entire thing (no lid necessary!) into the oven.
- Set the oven timer for 20 minutes. After that, turn off the steam but leave the same temperature. Open the oven door briefly to vent the moisture out, and turn your loaf around if you like. Bake for a further 15-20 minutes, until it's deeply golden.
- Remove the bread to a cooling rack (take the parchment paper out from underneath it), and let it cool for AT LEAST TWO HOURS. I know you'll want to cut it. I get it. But it's actually still cooking and forming the right structure inside. If you cut it when it's too warm, you'll end up with a gummy loaf of bread after all your efforts.
- Slice and serve, at last! Sourdough bread will keep for a couple of days on the counter, and can be sliced and frozen after that.
Notes
- Why isn’t this recipe in cups?! More than for any other baking, I want you to weigh your ingredients here. It’s the only accurate method of getting the right dough consistency, so if you don’t own a set of scales I’m going to kindly request that now’s the time to invest in one.
- Sourdough starter. If this is your first foray into sourdough, you’ll need an active starter ferment before you can make a loaf. The bad news is this takes up to a couple of weeks when you’re going from scratch! The good news is that it’s not hard. The better news is that sourdough is so popular now that you’ll likely be able to ask a friend, neighbour or local bakery to share a little of theirs if you just can’t wait to make your own. If you are keen to make your own starter, the very best guide I know for it is written by Elaine over at the wonderful site Foodbod. I can’t improve on her instructions and I’m not going to try; Elaine’s guide to starter is here.
- A mixer or by hand? I use a KitchenAid to do the first mix of my dough, but you really don’t need one for sourdough. The only real mixing is done at the very beginning, and only until the dough is lumpy and raggedy, so it’s not hard to do with a spatula.
- Banneton/proving basket. I bought my bannetons at my local kitchen store, they’re widely available and easy to find online as well. For this quantity of dough you’ll need a ‘large’ sized oval or round. If you don’t have a banneton you can use a tea towel set inside a mixing bowl. Dust the towel or banneton VERY liberally with rice flour so the dough doesn’t stick to it. I use rice rather than wheat because it doesn’t absorb into the loaf as readily, making it less likely for the bread to get stuck in the banneton.
- Flour. Sourdough really needs a ‘strong’ flour, by which I mean one with a high proportion of protein. All-purpose doesn’t really cut it here. Look for a bread flour that’s got somewhere from 11-14% protein for the best dough structure (most bread flours will list this percentage somewhere on the packaging). Want to use whole wheat or a different grain? Go for it, but I really recommend you get comfortable with a ‘plain’ white wheat loaf first. Adding in different flours can drastically alter the flour-to-liquid ratios and the structure of your bread, so they require more understanding of what your dough should look like and how it behaves.
- Scoring the loaf. We score sourdough not just for the pretty effect, but so it can rise to its fullest capacity in the oven. You need a sharp razor blade or bread lame, or, at a minimum, a very sharp serrated knife. Different cuts give different results in the oven and you can get as fancy as you feel comfortable with. Just remember that definite, even cuts work best. For beginners, I recommend a large cross slashed into the top of a round loaf, or a long, single 45-degree angled cut along the side of an oval loaf.


")


2 Responses
I’m so happy to hear this, Sarah! Kamut flour is wonderful and a great ‘sub’ for regular bread flour, I love the nuttiness it adds to the finished loaf.
I’ve been making sourdough bread for about 15 years and this recipe along with my new combi steam oven produces one of the best loaves I’ve ever made! Previously I would bake loaves in a cast iron dutch oven with lid on to capture the steam. Now it is just baked on the base of a cast iron saute pan and the steam oven does the rest. I sometimes substitute 100g of the white bread flour with kamut flour and it is equally as tasty.