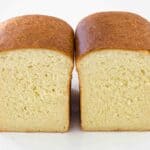
Soft White Sandwich Bread
This is my version of the perfect sandwich loaf. It’s plush and pillowy, and the addition of both milk and oil makes it soft and perfect for sandwiches.
Servings: 12 1 loaf (9x4 inches, 23x10cm)
Calories: 265kcal
Ingredients
- 5 cups unbleached white bread flour
- 2 tsp instant yeast or active dry yeast, see notes
- ¾ cup whole milk lukewarm
- ¾ cup water lukewarm
- ⅓ cup neutral flavored oil vegetable, rice bran or sunflower
- 2 Tbsp granulated sugar
- 1 1/2 tsp fine salt
Instructions
Make dough
- Put all the ingredients into the bowl of a mixer fitted with the dough hook. Mix on low speed until a smooth, elastic dough forms and pulls away from the sides of the bowl; about 6 minutes. This step can be done by hand, mixing the ingredients with a metal spoon until they come together, then turning the dough onto a lightly oiled surface and kneading well for 5-6 minutes. The dough should be soft but not too sticky. Add a little more water if it seems very stiff.5 cups unbleached white bread flour, 2 tsp instant yeast, ¾ cup whole milk, ¾ cup water, ⅓ cup neutral flavored oil, 2 Tbsp granulated sugar, 1 1/2 tsp fine salt
First Proof
- Transfer the dough to a lightly oiled bowl and put it into the oven, uncovered. Set your oven to dough proving setting (or steam-only setting, if you don’t have dough proving), 100ºF/38ºC, 80% humidity. Set the timer for 40 minutes, after which the dough should have doubled in size. Sometimes, if your kitchen was very cool while mixing the dough, the first proof will take longer. If the dough doesn’t seem risen enough, proof for a further 5-10 minutes.
Flatten the dough and form a loaf
- Scrape the dough onto a lightly oiled countertop. Gently press it out into a rectangle about 12x8 inches (30x20cm). Fold the rectangle lengthwise into thirds. Press it back into a 12x8 inch rectangle again, then turn it 90 degrees and repeat the folds. You won't be able to see them distinctly but you now have 9 layers. Lift one of the open seam sides of the dough and roll it away from you to make a neat, tight spiral. The goal is to end up with an even roll of dough just a little smaller than your pan. This tight rolling and tucking ensures the exterior of the loaf is stretched and smooth, which gives a nice even rise and a smooth finish. Put the roll into a 9x4 inch (23x10cm) loaf pan, seam side down.
Second proof
- Set the dough to do its second rise, putting the pan into the oven (uncovered). Set your oven again to dough proving setting (or steam-only setting, if you don’t have dough proving), 100ºF/38ºC, 80% humidity. Set the timer for 30 minutes. The dough should almost double during this step; when fully proofed it will spring back into shape when pressed gently with a fingertip.
Bake
- Leave the pan in the oven and alter the settings to Combi Steam, 400°F/200°C, 60% steam. Set your timer for 25 minutes.
- When the timer sounds, alter your oven settings to 400°F/200°C, convection/fan forced (no steam). Continue baking the loaf until it’s fully cooked through and golden, around 15 minutes longer. If you’d like to be certain your bread is cooked, check the internal temperature of the loaf with an instant read thermometer. When finished it should read 190°F/88°C.
- Turn the cooked loaf out of the pan onto a cooling rack and let it cool for at least 2 hours before slicing.
Notes
- If you have active dry yeast you can use it in this recipe instead of instant. The first proof may take 10-15 minutes longer than with instant yeast.
- There are subtle variations you can make to this recipe and I encourage you to do so, because everyone’s perfect loaf is different:
- Switching in melted butter for the oil gives a more toasty aroma and soft, slightly more open crumb.
- Milk powder vs whole milk also changes the texture, making the bread a little silkier. Omit the milk, instead using 1 ½ cups water in total, and ¼ cup whole milk powder.
- I do not recommend making this particular loaf with whole wheat or grains. The ratios of liquid will be 'off' and you won't end up with a good loaf of bread. You'll be better off using a specific recipe for grain or whole wheat bread instead.
- Like most breads, this is best eaten on the day of baking. It makes lovely toast for a couple of days after that, or can be sliced and frozen once it’s fully cooled, ready for lunch boxes all week long.
Nutrition
Calories: 265kcal | Carbohydrates: 41g | Protein: 8g | Fat: 8g | Saturated Fat: 1g | Polyunsaturated Fat: 4g | Monounsaturated Fat: 2g | Trans Fat: 0.04g | Cholesterol: 2mg | Sodium: 299mg | Potassium: 94mg | Fiber: 2g | Sugar: 3g | Vitamin A: 26IU | Vitamin C: 0.01mg | Calcium: 28mg | Iron: 1mg
